前の記事でApacheとMySQLをソースインストールしてみたので、
今回はそこにPHPを入れてLAMPにして、WordPressサーバにしてみます。
最下部に「エラー無しでやる方法」を記載しています。
■PHPインストール
PHPもソースインストールです!
ソースファイルをダウンロードして解凍します。
|
1 2 3 |
# cd /usr/local/src # wget http://php.net/get/php-7.1.0.tar.gz/from/this/mirror -O php-7.1.0.tar.gz # tar xvzf php-7.1.0.tar.gz |
半年以上前ですが、パッケージで構築したLAMP環境にWordPressをインストールする、という記事を書きました。
その時にyumで入れた必要パッケージ(php-mbstring php-gd php-mysql)から、必要そうなconfigureオプションを調べました。
|
1 2 |
# cd php-7.1.0 # ./configure --enable-mbstring --with-gd --with-mysqli=mysqlnd |
configure実行後下記エラーが。
|
1 |
configure: error: xml2-config not found. Please check your <span style="color: #ffff00"><strong>libxml2</strong></span> installation. |
libxmlがインストールされていないってことかな、と思いインストールしようとすると…
|
1 2 3 4 5 6 |
# yum install libxml2 Loaded plugins: priorities, update-motd, upgrade-helper amzn-main/latest | 2.1 kB 00:00 amzn-updates/latest | 2.3 kB 00:00 Package libxml2-2.9.1-6.3.49.amzn1.x86_64 <strong><span style="color: #ffff00">already installed</span></strong> and latest version Nothing to do |
既にある、と言われてしまいます。???
これ↓が足りなかったようです。
|
1 |
# yum install <span style="color: #ffff00"><strong>libxml2-devel</strong></span> |
再度configureします。するとまたエラーが発生。
|
1 2 3 4 5 6 7 |
# ./configure --enable-mbstring --with-gd --with-mysqli=mysqlnd ~ checking for FreeType 2... no checking whether to enable truetype string function in GD... no checking whether to enable JIS-mapped Japanese font support in GD... no If configure fails try --with-webp-dir= configure: error: png.h not found. |
下記モジュールが足りなかったようなのでインストールします。
|
1 |
# yum install libpng-devel |
そして再々度configure。
問題なければコンパイル(make)→インストール(make install)。
|
1 2 3 |
# ./configure --enable-mbstring --with-gd --with-mysqli=mysqlnd # make # make install |
PHPがインストールできたようです。
Apacheのドキュメントルートにテスト用のphpinfoを作成してみます。
|
1 2 |
# vi /usr/local/apache2/htdocs/test.php <?php echo phpinfo(); ?> |
PHPと連携させるためApacheを再起動します。
|
1 |
# /etc/init.d/httpd restart |
下記URLにアクセスするとphpinfoが表示されるはず。
…だったのですがどうもうまくいかないようで、ただの文字列(ブラウザによっては空白)として表示されてしまいました。
|
1 |
http://サーバIP/test.php |
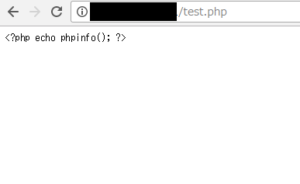
ApacheとPHPの連携に必要なオプションが抜けていたようです。
このオプションを追加して再度configureしてみましょう。
|
1 2 3 4 5 6 7 8 9 |
(/usr/local/src/php-7.1.0 内で) # ./configure --enable-mbstring --with-gd --with-mysqli=mysqlnd <span style="color: #ffff00"><strong>--with-apxs2</strong></span>=/usr/local/apache2/bin/apxs # make ~ /usr/local/src/php-7.1.0/ext/standard/info.c:1034: undefined reference to `_tsrm_ls_cache' /usr/local/src/php-7.1.0/ext/standard/info.c:1037: undefined reference to `_tsrm_ls_cache' /usr/local/src/php-7.1.0/ext/standard/info.c:1040: undefined reference to `_tsrm_ls_cache' collect2: error: ld returned 1 exit status make: *** [sapi/cli/php] Error 1 |
エラーが発生しましたが、make clean(※)をしたら直りました。
※中間ファイル等を削除しソースコードのみの状態にする
|
1 2 3 |
# make clean # make # make install |
それでは再度Apacheを再起動してさきほどのURLにアクセスしてみましょう。
|
1 |
# /etc/init.d/httpd restart |
結果はさきほどと同じ。

ここでかなり詰まりましたが、httpd.confを編集することで解消しました。
まず、conf内で指定するphp.iniをコピーで作成します。
|
1 2 |
(/usr/local/src/php-7.1.0 内で) # cp -ip php.ini-production php.ini |
Apacheのconfに必要な設定を追記します。
|
1 2 3 4 5 6 7 8 |
# vi /usr/local/apache2/conf/httpd.conf ~ AddType application/x-compress .Z AddType application/x-gzip .gz .tgz <span style="color: #ffff00"><strong>AddType application/x-httpd-php .php</strong> <strong>AddType application/x-httpd-php-source .phps</strong></span> ~ <strong><span style="color: #ffff00">PHPIniDir "/usr/local/src/php-7.1.0/php.ini"</span></strong> (最下行) |
設定反映のためApacheを再起動します。
|
1 |
# /etc/init.d/httpd restart |
さきほどのURLを確認すると、phpinfoが表示されました!
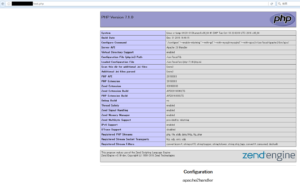
なお、外部からphpinfoが見えるのはよろしくないので、削除しておきます。
|
1 |
# rm /usr/local/apache2/htdocs/test.php |
■WordPressインストール
下記サイトから最新版のWordPressをダウンロードできます。
|
1 |
https://ja.wordpress.org/ |
まずはzipファイルをダウンロード→解凍。
|
1 2 3 |
# cd /usr/local/src # wget https://ja.wordpress.org/wordpress-4.7-ja.tar.gz # tar xvzf wordpress-4.7-ja.tar.gz |
解凍されたディレクトリを、ドキュメントルート直下に配置。
Apacheがアクセスできるよう所有者を変更します。
|
1 2 |
# mv wordpress /usr/local/apache2/htdocs/ # chown -R apache:apache /usr/local/apache2/htdocs/wordpress/ |
sampleファイルからwp-configを作成し、編集します。
作成するDB名、ユーザ名、パスワードを記載します。
|
1 2 3 4 5 6 7 8 9 10 11 12 13 |
# cd /usr/local/apache2/htdocs/wordpress/ # mv wp-config-sample.php wp-config.php # vi wp-config.php ~ /** WordPress のためのデータベース名 */ define('DB_NAME', '<span style="color: #ffff00"><strong>wordpressdb</strong></span>'); /** MySQL データベースのユーザー名 */ define('DB_USER', '<span style="color: #ffff00"><strong>wordpressuser</strong></span>'); /** MySQL データベースのパスワード */ define('DB_PASSWORD', '<span style="color: #ffff00"><strong>wordpresspassword</strong></span>'); ~ |
MySQL側でもDBとユーザを作成しておきます。
|
1 2 3 4 5 6 7 8 9 10 |
# /usr/local/mysql/bin/mysql -u root -p mysql> create database <strong><span style="color: #ffff00">wordpressdb</span></strong>; Query OK, 1 row affected (0.01 sec) mysql> grant all privileges on <strong><span style="color: #ffff00">wordpressdb</span></strong>.* to "<span style="color: #ffff00"><strong>wordpressuser</strong></span>"@"localhost" identified by "<span style="color: #ffff00"><strong>wordpresspassword</strong></span>"; Query OK, 0 rows affected, 1 warning (0.01 sec) mysql> flush privileges; Query OK, 0 rows affected (0.02 sec) |
下記URLにアクセスするとWordPress初期設定画面に遷移するはず。
|
1 |
http://サーバIP/wordpress |
でしたが、こんな表示になりました。
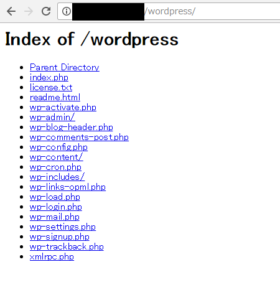
これも煮詰まりましたが、気づいてみれば簡単。
DirectoryIndexにindex.phpを追加してあげましょう。
|
1 2 3 4 |
# vi /usr/local/apache2/conf/httpd.conf ~ DirectoryIndex index.html <span style="color: #ffff00"><strong>index.php</strong></span> ~ |
Apacheを再起動して再度さきほどのURLにアクセスすると…
|
1 |
# /etc/init.d/httpd restart |
|
1 |
http://サーバIP/wordpress にアクセス |
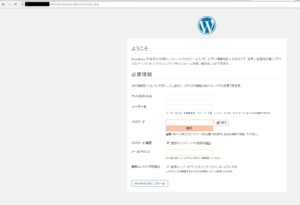
WordPressの設定画面になりました。
初期設定を進め、しかしいざログインしようとするとまたエラーが。
HTTP500エラーとのこと。
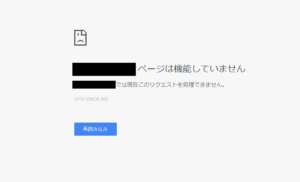
ログを確認してみると、
|
1 2 3 |
# tail /usr/local/apache2/logs/error_log ~ [Mon Dec 19 16:48:23.753638 2016] [php7:error] [pid 8145:tid 140480075470592] [client **********] <span style="color: #ffff00"><strong>PHP Fatal error: Uncaught Error: Call to undefined function gzinflate()</strong></span> in /usr/local/apache2/htdocs/wordpress/wp-includes/class-requests.php:947\nStack trace:\n#0 /usr/local/apache2/htdocs/wordpress/wp-includes/class-requests.php(886): |
gzinflateという関数が無いよ、というエラーのようです。
この関数を扱えるように、--with-zlibというコンパイルオプションを付与してPHPを再インストールします。
|
1 2 3 4 |
# cd /usr/local/src/php-7.1.0 # ./configure --enable-mbstring --with-gd --with-mysqli=mysqlnd --with-apxs2=/usr/local/apache2/bin/apxs <strong><span style="color: #ffff00">--with-zlib</span></strong> # make # make install |
|
1 |
# /etc/init.d/httpd restart |
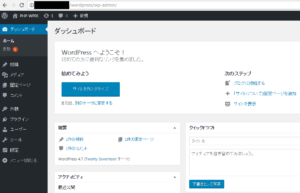
そしてApacheを再起動してURLを確認すると、今度は見れるようになりました!
ここから記事の編集などが行えます。
■ちなみに
WordPressを構築して、(EC2のAMIとかの)イメージにしてそこから起動するとWordPressが使えなくなります。
これはサーバのIPが(それに伴いサイトのURLも)変わるからですが、
この現象に対して、私は長いことWordPress再インストールで対応していました。
再インストールは面倒なので、サイトURLを保存しているテーブルを新しいURLで更新してあげましょう。
|
1 2 3 |
mysql> use wordpressdb (どんな名前のDBを使用するかは、設定により異なります) mysql> update wp_options set option_value = 'http://~(新しいURL)' where option_name = 'siteurl' ; mysql> update wp_options set option_value = 'http://~(新しいURL)' where option_name = 'home' ; |
■エラー無しでやる方法
・必要なパッケージのインストール
|
1 |
# yum install libxml2-devel libpng-devel |
・PHPインストール
|
1 2 3 4 5 6 7 |
# cd /usr/local/src # wget http://php.net/get/php-7.1.0.tar.gz/from/this/mirror -O php-7.1.0.tar.gz # tar xvzf php-7.1.0.tar.gz # cd php-7.1.0 # ./configure --enable-mbstring --with-gd --with-mysqli=mysqlnd --with-apxs2=/usr/local/apache2/bin/apxs --with-zlib # make # make install |
・PHP、Apache設定
|
1 2 3 4 5 6 7 8 9 10 11 12 13 |
# cp -ip php.ini-production php.ini # vi /usr/local/apache2/conf/httpd.conf ~ DirectoryIndex index.html <strong><span style="color: #ffff00">index.php</span></strong> ~ AddType application/x-compress .Z AddType application/x-gzip .gz .tgz <strong><span style="color: #ffff00">AddType application/x-httpd-php .php</span></strong> ←追加部分 <span style="color: #ffff00"><strong>AddType application/x-httpd-php-source .phps</strong></span> ←追加部分 ~ <strong><span style="color: #ffff00">PHPIniDir "/usr/local/src/php-7.1.0/php.ini"</span></strong> ←最下行に追加 # /etc/init.d/httpd restart |
・WordPressインストール
|
1 2 3 4 5 6 7 8 9 10 11 12 13 14 15 16 17 18 19 20 |
# cd /usr/local/src # wget https://ja.wordpress.org/wordpress-4.7-ja.tar.gz # tar xvzf wordpress-4.7-ja.tar.gz # mv wordpress /usr/local/apache2/htdocs/ # chown -R apache:apache /usr/local/apache2/htdocs/wordpress/ # cd /usr/local/apache2/htdocs/wordpress/ # mv wp-config-sample.php wp-config.php # vi wp-config.php ~ /** WordPress のためのデータベース名 */ define('DB_NAME', '<span style="color: #ffff00"><strong>wordpressdb</strong></span>'); /** MySQL データベースのユーザー名 */ define('DB_USER', '<span style="color: #ffff00"><strong>wordpressuser</strong></span>'); /** MySQL データベースのパスワード */ define('DB_PASSWORD', '<span style="color: #ffff00"><strong>wordpresspassword</strong></span>'); ~ |
・WordPressインストール(DB)
|
1 2 3 4 5 6 7 8 9 10 |
# /usr/local/mysql/bin/mysql -u root -p mysql> create database <span style="color: #ffff00"><strong>wordpressdb</strong></span>; Query OK, 1 row affected (0.01 sec) mysql> grant all privileges on <span style="color: #ffff00"><strong>wordpressdb</strong></span>.* to "<span style="color: #ffff00"><strong>wordpressuser</strong></span>"@"localhost" identified by "<span style="color: #ffff00"><strong>wordpresspassword</strong></span>"; Query OK, 0 rows affected, 1 warning (0.01 sec) mysql> flush privileges; Query OK, 0 rows affected (0.02 sec) |
・http://サーバIP/wordpress にアクセスして初期設定を進める
投稿者プロフィール
- 2015年8月入社。弊社はインフラ屋ですが、アプリも作ってみたいです。


