はじめに
前回の続きとなります。
https://www.skyarch.net/blog/?p=18370
よくある話で、温度、湿度、気圧をAWS IoTに投げ可視化するのですが
最近高頻度でUpdateされ、便利になって大好きなCloudWatch Logs Insightsを使ってみます。
出来たもの
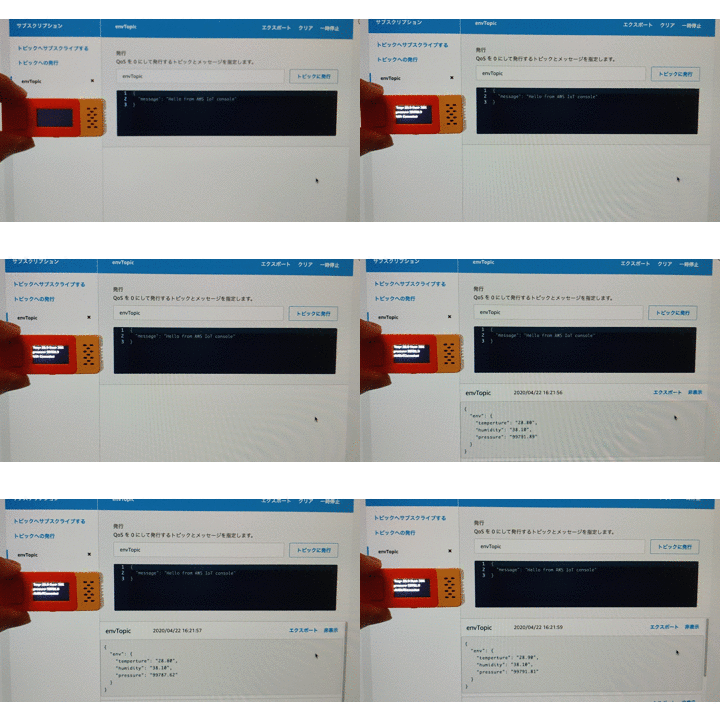
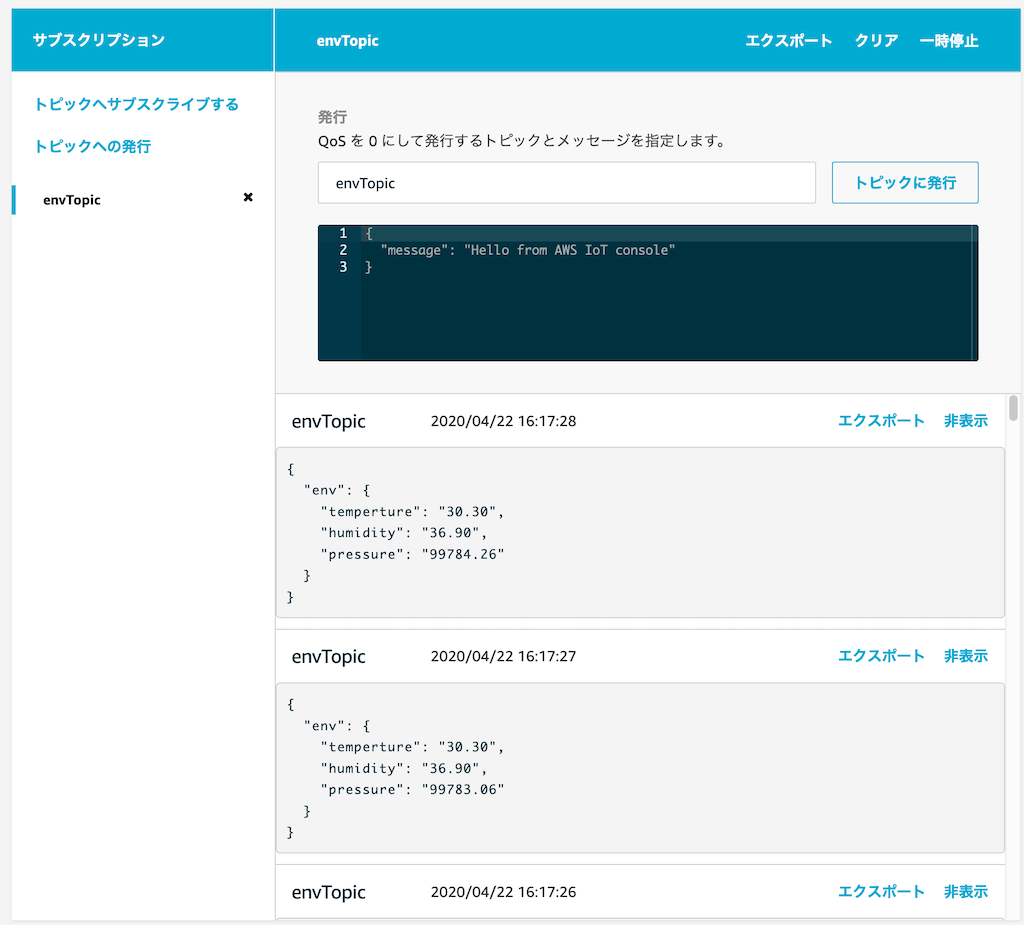
電源を入れると、Wifi接続 ⇢ AWS IoTへ接続 ⇢ センサ値をPublishと進み、AWS IoTのテスト画面にて受信できた事を確認できるという動画です。
- 温度・湿度・気圧を画面内に表示
- 温度・湿度・気圧をAWS IoTにPublish
- Aボタンを押下すると (離した際に)LED状態が変化します。 (将来用に前回のソースコードそのまま)
可視化
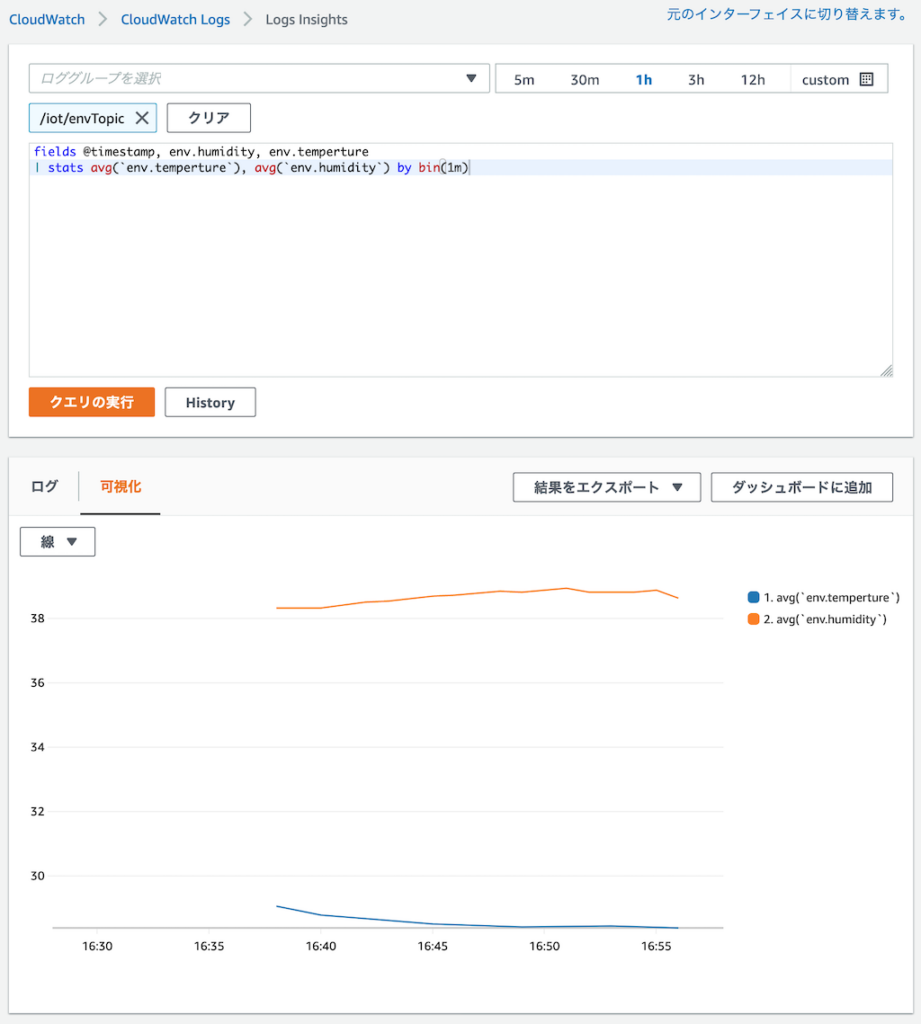
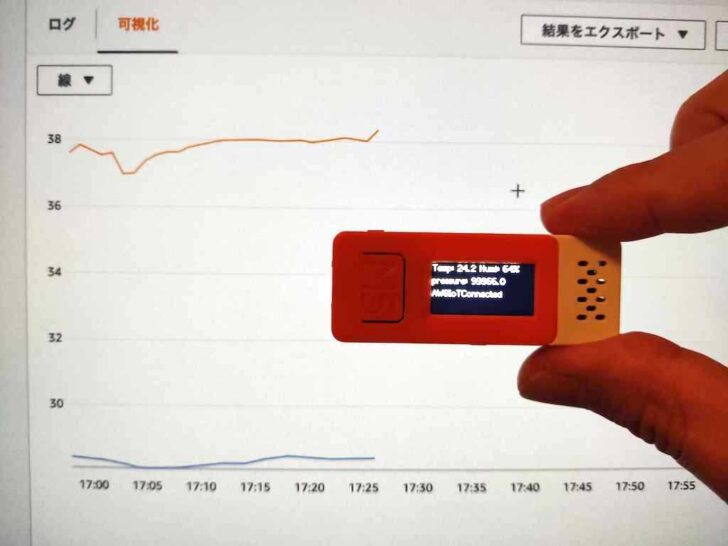
CloudWatch Logs Insightsを利用し簡易的に可視化しています。
温度、湿度の1分毎平均値をプロット
目次
手順の概要
- AWS IoTで モノ/証明書/ポリシーを作成し適切な関連にAttach (AWS CLIにて実施)
- コード書く/転送
- AWS IoTで データ受信確認
- AWS IoTのルールでCloudWatch Logsへ書き出し
- CloudWatch Logs Insightsでクエリを書き可視化
M5StickCで利用するライブラリ等
他にMQTT通信できるライブラリは無いものかと
Aruduino IDEのライブラリマネージャーから探してみましたが
Betaだったり、あまり人気が無かったりという事で結局人気が一番ある下記ライブラリを利用しました。
制限事項として、PublishはQoS 0のみ、Subscribe QoS 0 or 1、メッセージサイズが標準ではとても小さい(128Byte)等色々あります。
PubSubClient
https://pubsubclient.knolleary.net/
Githubページ - 制限事項が色々と記載されています
https://github.com/knolleary/pubsubclient
参考にさせて頂いた記事
ESP32でAWS IoTに繋いでThing Shadowを弄る
https://blog.maripo.org/2017/07/esp32-aws-iot/
ESP32〜AWS IoTでMQTT通信して詰んだ話【ClientID】
https://qiita.com/rockguitar67/items/4f028500d520dbf14be1
【macOS】デバイスとAWS IoTとの接続設定を行うスクリプトをかいたった:証明書の設定からThing登録まで行う
https://dev.classmethod.jp/articles/aws-iot-connect-device-script/
実行環境
MacOS上で実施しました。
手順
1. AWS IoTで モノ/証明書/ポリシーを作成し適切な関連にAttach (AWS CLIにて実施)
注記
- 下記コマンドを流して行くと、カレントディレクトリにAWS IoTにて作成された証明書/鍵ファイルが保存されます。
- ポリシーは全許可のテスト用のもののため、ご利用は計画的に
モノを作成
1 2 |
DEVICE_NAME="M5Stick01" aws iot create-thing --thing-name ${DEVICE_NAME} |
ポリシーを作成 (テスト用全許可ポリシーのため要注意)
1 2 |
aws iot create-policy --policy-name ${DEVICE_NAME}-policy --policy-document \ '{ "Version": "2012-10-17", "Statement": [{ "Effect": "Allow", "Action": "iot:*", "Resource": "*" }]}' |
証明書と鍵を作成
1 2 3 4 5 |
aws iot create-keys-and-certificate --set-as-active \ --certificate-pem-outfile ${DEVICE_NAME}-certificate.pem.crt \ --private-key-outfile ${DEVICE_NAME}-private.pem.key \ --public-key-outfile ${DEVICE_NAME}-public.pem.key \ --query "certificateArn" |
こちらの結果(ARN表記で出力される証明書)を下記コマンド(Policyと証明書を紐付け/モノと証明書を紐付け)にて利用する
Policyと証明書を紐付け
1 |
aws iot attach-principal-policy --policy-name ${DEVICE_NAME}-policy --principal "上記コマンド実行結果をペーストarn:aws:iot:..." |
モノと証明書を紐付け
1 |
aws iot attach-thing-principal --thing-name ${DEVICE_NAME} --principal "上記コマンド実行結果をペーストarn:aws:iot:..." |
AWS IoT エンドポイントを取得
1 |
aws iot describe-endpoint --query "endpointAddress" --endpoint-type iot:Data-ATS |
2. コード書く/転送
下記の [] 括弧部分をご自身の物に書き換える必要があります。
rootCA
AWS IoTの開発者ドキュメント内に記載のリンクから取得します。
https://docs.aws.amazon.com/ja_jp/iot/latest/developerguide/server-authentication.html#server-authentication-certs
clientCert/clientPrivateKey
上記CLIコマンドを実行した結果作成される3ファイルのうち2ファイルを利用します。
- [DEVICE_NAME]-certificate.pem.crt
- [DEVICE_NAME]-private.pem.key
コード
500msec毎にデータをAWSIoTへ送信しております
1 2 3 4 5 6 7 8 9 10 11 12 13 14 15 16 17 18 19 20 21 22 23 24 25 26 27 28 29 30 31 32 33 34 35 36 37 38 39 40 41 42 43 44 45 46 47 48 49 50 51 52 53 54 55 56 57 58 59 60 61 62 63 64 65 66 67 68 69 70 71 72 73 74 75 76 77 78 79 80 81 82 83 84 85 86 87 88 89 90 91 92 93 94 95 96 97 98 99 100 101 102 103 104 105 106 107 108 109 110 111 112 113 114 115 116 117 118 119 120 121 122 123 124 125 126 127 128 129 130 131 132 133 134 135 136 137 138 139 140 141 142 143 144 145 146 147 148 |
/* note: need add library Adafruit_BMP280 from library manage Github: https://github.com/adafruit/Adafruit_BMP280_Library */ #include <M5StickC.h> #include "DHT12.h" #include <Wire.h> #include "Adafruit_Sensor.h" #include <Adafruit_BMP280.h> #include <ArduinoJson.h> #include <WiFiClientSecure.h> #include <PubSubClient.h> // Wifi Settings const char* ssid = "[ご自身の環境のWifiSSID]"; const char* password = "[ご自身の環境のWifiPassowrd]"; // AWS IoT Settings const char* endpoint = "[ご自身のAWSアカウントのIoTエンドポイント]"; // 東京リージョンなら右記のような形 xxxx-ats.iot.ap-northeast-1.amazonaws.com const int port = 8883; const char* pubTopic = "[適当なTopic名 - 記事中では envTopic としていました]"; const char* clientId = "[適当なデバイス名 - 記事中では M5Stick01 としていました]"; // const char* rootCA = \ "-----BEGIN CERTIFICATE-----\n" \ "...\n" \ // [ご自身で取得したRootCA] "-----END CERTIFICATE-----\n"; const char* clientCert = \ "-----BEGIN CERTIFICATE-----\n" \ "...\n" \ // [上記CLIコマンドで生成したデバイス用証明書] "-----END CERTIFICATE-----\n"; const char* clientPrivateKey = \ "-----BEGIN RSA PRIVATE KEY-----\n" \ "...\n" \ // [上記CLIコマンドで生成したデバイス用秘密鍵] "-----END RSA PRIVATE KEY-----\n"; // Wifi/Network WiFiClientSecure httpsClient; PubSubClient mqttClient(httpsClient); char buffer[128]; // LED_PIN #define M5_STICK_PIN_LED 10 boolean ledState = true; // HIGH: LED Off/Low: LED On DHT12 dht12; Adafruit_BMP280 bme; void checkWiring() { while (!bme.begin(0x76)) { M5.Lcd.fillScreen(BLACK); M5.Lcd.setCursor(0, 0, 2); M5.Lcd.println("Could not find a valid BMP280 sensor, check wiring!"); delay(1000); } } void reconnect() { while (!mqttClient.connected()) { if (mqttClient.connect(clientId)) { M5.Lcd.setCursor(0, 40, 2); M5.Lcd.println("AWSIoTConnected"); } else { M5.Lcd.setCursor(0, 40, 2); M5.Lcd.printf("AWSIoTConnect Failed. state=%d", mqttClient.state()); // Wait 5 seconds before retrying delay(5000); } } } void setup() { // put your setup code here, to run once: M5.begin(); M5.Lcd.setRotation(3); M5.Lcd.fillScreen(BLACK); // I2C Wire.begin(0,26); // GPIOSetup pinMode(M5_STICK_PIN_LED, OUTPUT); digitalWrite(M5_STICK_PIN_LED, ledState); // check ENVHat checkWiring(); // WifiSetup //// Avoid Connect Error (JIC) WiFi.disconnect(true); delay(1000); //// Connect WiFi.begin(ssid, password); while (WiFi.status() != WL_CONNECTED) { delay(500); } M5.Lcd.setCursor(0, 40, 2); M5.Lcd.printf("Wifi Connected"); // Configure MQTT Client httpsClient.setCACert(rootCA); httpsClient.setCertificate(clientCert); httpsClient.setPrivateKey(clientPrivateKey); mqttClient.setServer(endpoint, port); } void loop() { // update button state M5.update(); // Button Pressed if (M5.BtnA.wasReleased()) { ledState = !ledState; digitalWrite(M5_STICK_PIN_LED, ledState); } // check ENVHat checkWiring(); // display Temp/Humidity/Pressure float tmp = dht12.readTemperature(); float hum = dht12.readHumidity(); M5.Lcd.setCursor(0, 0, 2); M5.Lcd.printf("Temp: %2.1f Humi: %2.0f%%", tmp, hum); float pressure = bme.readPressure(); M5.Lcd.setCursor(0, 20, 2); M5.Lcd.printf("pressure: %2.1f", pressure); // create JSON DynamicJsonDocument doc(1024); JsonObject data = doc.createNestedObject("env"); data["temperture"] = tmp; data["humidity"] = hum; data["pressure"] = pressure; serializeJson(doc, buffer, sizeof(buffer)); // Debug JSON in SerialConsole Serial.println(buffer); // reconnect if (!mqttClient.connected()) { reconnect(); } // The client only supports publishing at QoS 0 mqttClient.publish(pubTopic, buffer); // wait delay(500); } |
3. AWS IoTで データ受信確認
AWS IoTサービスの左メニュー、テストを選択後
トピックのサブスクリプションに、ソースコード中の pubTopic と合わせたTopic名を入力し [トピックへのサブスクライブ] を押下します。
デバイスが正常に通信できれば、500msec 毎に送信されたデータが流れるように表示されます。
4. AWS IoTのルールでCloudWatch Logsへ書き出し
IoTルールでCloudWatch Logsへの吐き出しを作成します。
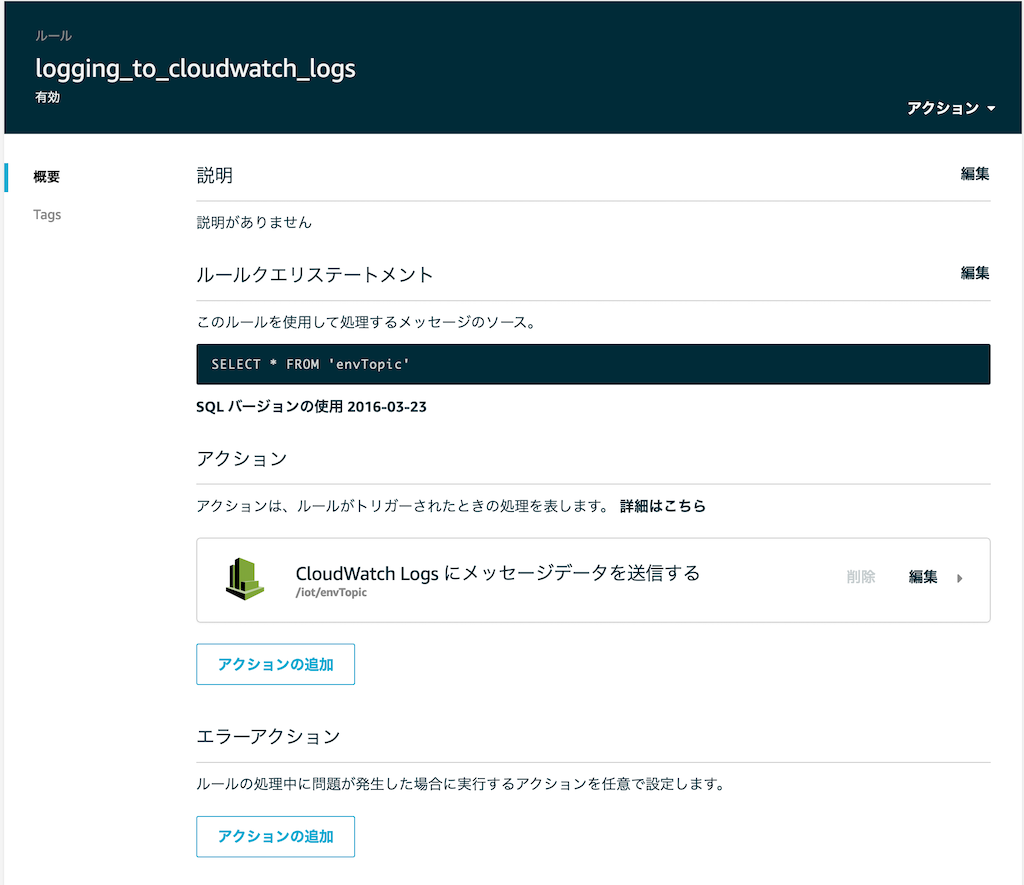
Topic名が適切に指定されていればロギングされる事を確認できるはずです。
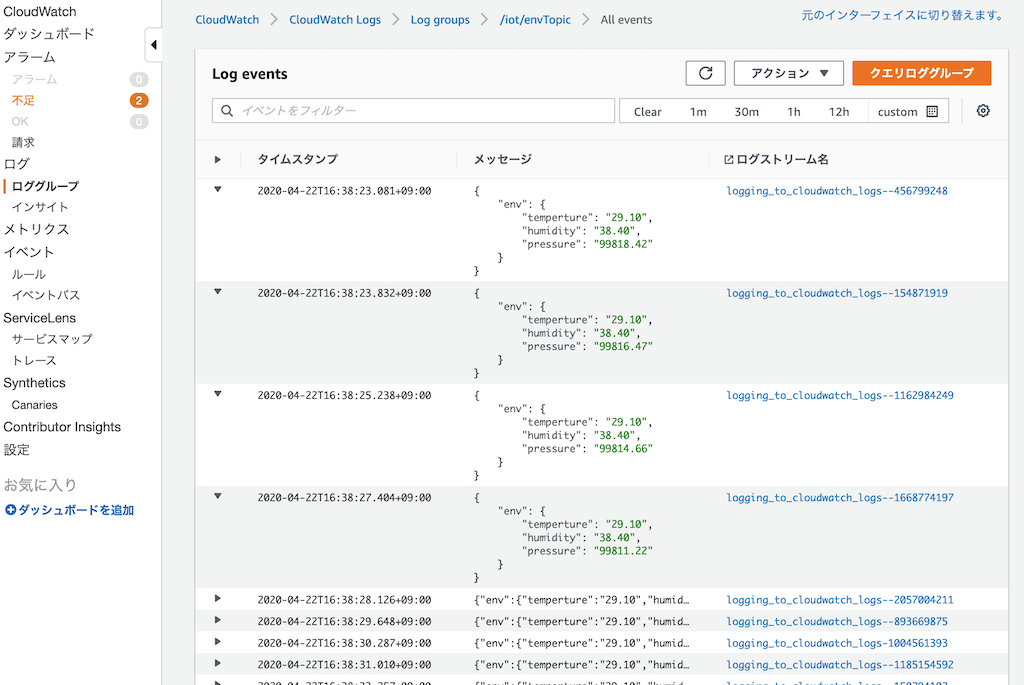
5. CloudWatch Logs Insightsでクエリを書き可視化
CloudWatch Insights を開きクエリとして下記を入力します。
1 2 |
fields @timestamp, env.humidity, env.temperture | stats avg(`env.temperture`), avg(`env.humidity`) by bin(1m) |
上記クエリを実行すると、下記結果を得ることができます。
可視化した結果をダッシュボードに追加できるため色々と表現出来そうです。
ログ集約された結果
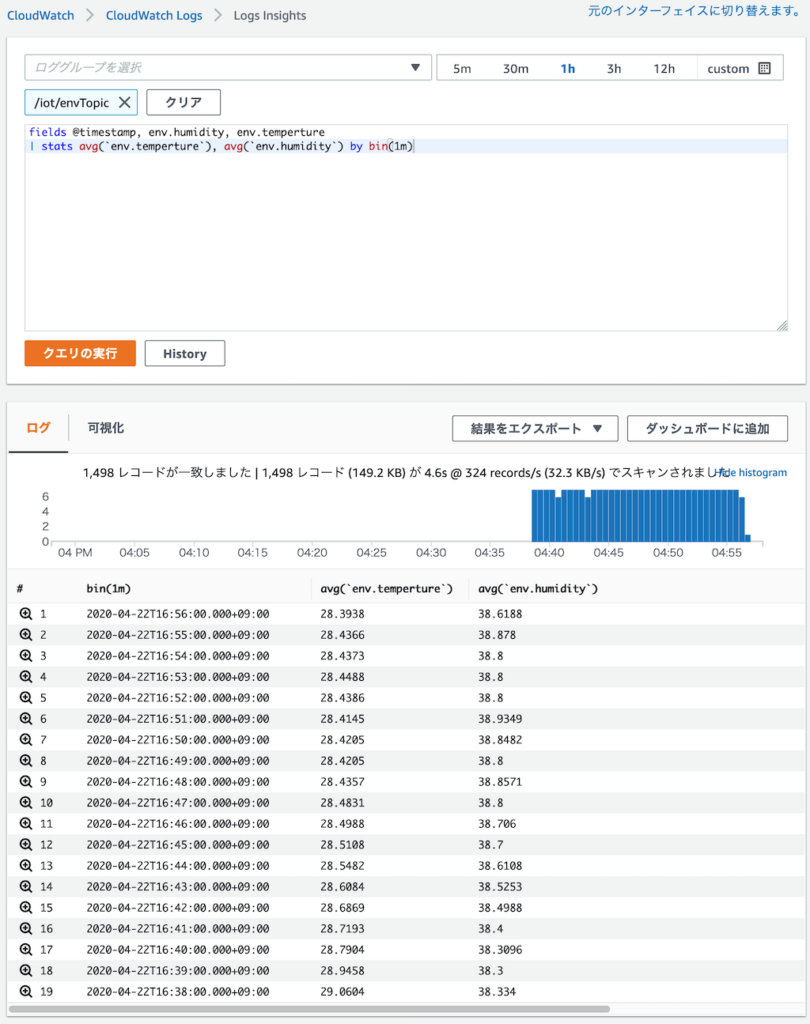
可視化した結果
はまった点
一通りサービス理解をしていたつもりでしたが、当初デバイスからプログラムを実行した結果下記エラーが出てハマりました...
Wifiには接続されるが、mqttClient.state() = -2 を返す状態
1 2 |
[E][ssl_client.cpp:33] _handle_error(): [start_ssl_client():199]: (-9984) X509 - Certificate verification failed, e.g. CRL, CA or signature check failed [E][WiFiClientSecure.cpp:132] connect(): start_ssl_client: -9984 |
証明書エラーだなと、色々見直したが問題なかったのでモノ・証明書の作り直し、証明書をシリアルコンソールに表示し、一語一句違わないか等を見ましたが問題無し
ふとAWS IoTの証明書ドキュメントを読むと、"エンドポイントの種類" にて、新しい証明書の場合エンドポイントが異なるよという事でした (トホホ...)
上記CLIコマンドで、describe-endpoint する際に --endpoint-type iot:Data-ATS というオプション付きでないと新しいエンドポイントが返却されないようです。
(AWSIoTの設定画面でエンドポイントを確認すると、-ats 付きですね)
AWS IoT Core は、iot:Data と iot:Data-ATS の 2 つの異なるデータエンドポイントタイプをサポートしています。iot:Data エンドポイントは、VerVeriSign Class 3 Public Primary G5 Root CA 証明書によって署名された証明書を提供します。iot:Data-ATS エンドポイントは、Amazon Trust Services CA によって署名されたサーバー証明書を提供します。
Debug実施方法
Debugレベルを上げる
ツール ⇢ Core Debug Level を上げる
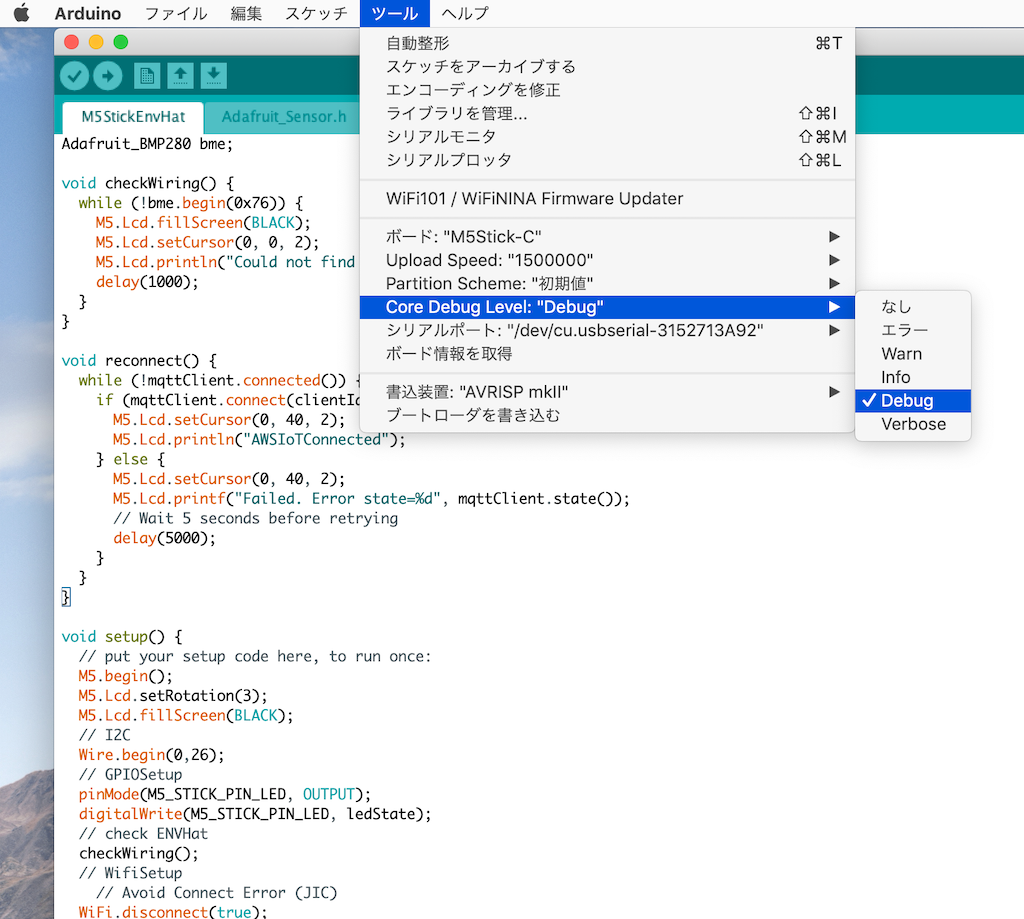
Debugログを確認する
ツール ⇢ シリアルモニタ で確認する (右下の通信速度を合わせないと文字化けするので注意)
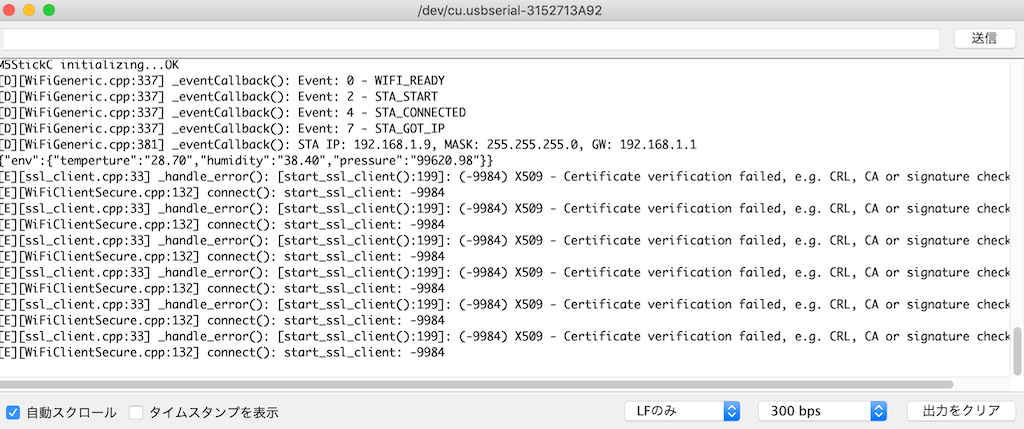
まとめ
次回はPub/Subに対応させ、Shadowと戯れてみようと思います。