こんにちは、幅広い視野を持つエンジニアを目指しています田中と申します。
この記事ではAmazon Elasticsearch ServiceのKibana(4.1.2-es2.0)を使っていてぶつかった問題の解決方法を見ていきます。
目的
Kibanaを使用し、IoTデバイスのセンサ値(TI社センサータグ)を可視化する。
やってみた事
Kibanaのデフォルトインデックスに頼らず、自分でインデックスパターンを定義する。
きっかけ
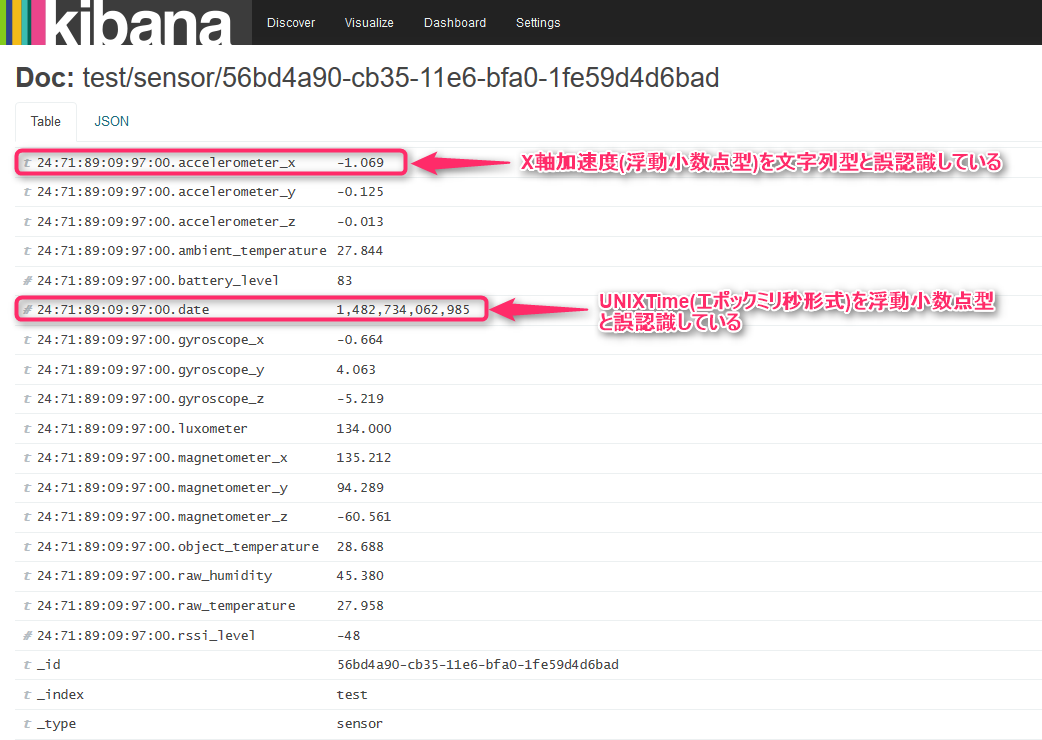
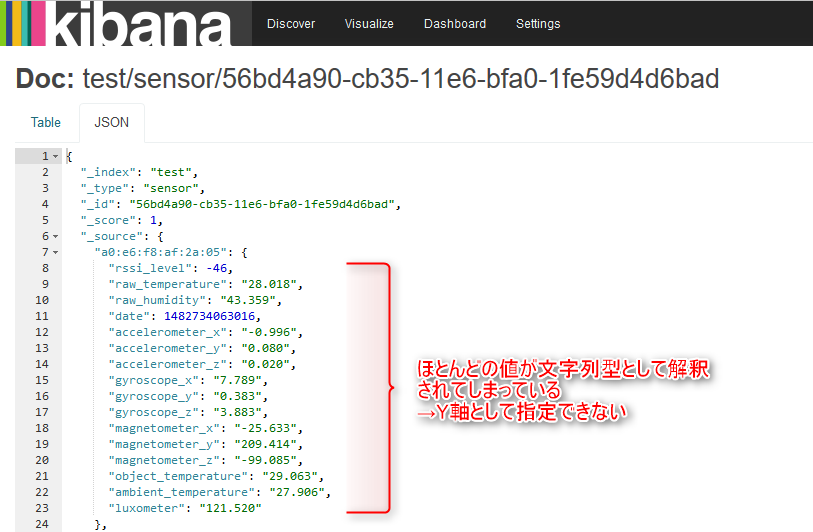
KibanaでIoTデバイスのセンサ値を可視化して表示しようと試みたが、Kibanaが日付型を自動認識してくれなかったり、センサ値を文字列型として認識してしまい、グラフの軸として指定できないということが起こった。(画像参照)


jsonを記述してインデックスパターンを定義する
マッピング定義を書いたjsonファイルを作ります。
|
1 2 3 4 5 6 7 8 9 10 11 12 13 14 15 16 17 18 19 20 21 22 23 24 25 26 27 28 29 30 31 32 33 34 35 36 37 38 39 40 41 42 43 44 45 46 47 48 49 50 51 52 53 54 55 56 57 58 59 60 61 62 63 64 65 66 67 68 69 70 71 72 73 74 75 76 |
{ "properties": { "a0:e6:f8:af:2a:05": { "properties": { "accelerometer_x": { "type": "float", "index": "analyzed" }, "accelerometer_y": { "type": "float", "index": "analyzed" }, "accelerometer_z": { "type": "float", "index": "analyzed" }, "ambient_temperature": { "type": "float", "index": "analyzed" }, "battery_level": { "type": "long", "index": "analyzed" }, "date": { "type": "date", "format": "strict_date_optional_time||epoch_millis" }, "gyroscope_x": { "type": "float", "index": "analyzed" }, "gyroscope_y": { "type": "float", "index": "analyzed" }, "gyroscope_z": { "type": "float", "index": "analyzed" }, "luxometer": { "type": "float", "index": "analyzed" }, "magnetometer_x": { "type": "float", "index": "analyzed" }, "magnetometer_y": { "type": "float", "index": "analyzed" }, "magnetometer_z": { "type": "float", "index": "analyzed" }, "object_temperature": { "type": "float", "index": "analyzed" }, "raw_humidity": { "type": "float", "index": "analyzed" }, "raw_temperature": { "type": "float", "index": "analyzed" }, "rssi_level": { "type": "long", "index": "analyzed" } } } } } |
https://www.elastic.co/guide/en/elasticsearch/reference/current/indices-templates.htmlを見ながら自分でテンプレートを書きます。
以下少し解説します。
/* データの型を明示する。https://www.elastic.co/guide/en/elasticsearch/reference/current/mapping-types.htmlを参照してください */
"type": "float"/* データの要素解析を行うかどうか、文字列として部分一致検索を行う場合は"analyzed"にしておく。詳しくはhttps://www.elastic.co/guide/en/elasticsearch/guide/current/mapping-intro.html */
"index": "analyzed"/* 時刻形式として受け付ける表現を明示する、複数指定も可能。moment.js(http://momentjs.com/)互換の時刻形式が指定できる。詳細はhttps://www.elastic.co/guide/en/elasticsearch/reference/current/mapping-date-format.html */
"format": "strict_date_optional_time||epoch_millis"
インデックスパターンを設定する
curlコマンドを利用してElasticsearchにインデックスパターンを設定します。
|
1 |
# curl -XPUT 'http://search-skyarch-elasticsearch2-xxxxxxxxxxxxxxxxxxxxxxxxxx.ap-northeast-1.es.amazonaws.com/test/_mapping/sensor' -d @mapping.json |
・・・とすると
|
1 |
{"error":{"root_cause":[{"type":"illegal_argument_exception","reason":"mapper [a0:e6:f8:af:2a:05.accelerometer_x] of different type, current_type [string], merged_type [float]"}], "status":400} |
と怒られます。どうやら既存のインデックスに対して適用することはできないようです。なので、下記コマンドで空のインデックスを新しく作成します。
|
1 |
# curl -XPUT 'http://search-skyarch-elasticsearch2-xxxxxxxxxxxxxxxxxxxxxxxxxx.ap-northeast-1.es.amazonaws.com/test2/' |
再びインデックスパターンの設定を試みます。
|
1 |
# curl -XPUT 'http://search-skyarch-elasticsearch2-xxxxxxxxxxxxxxxxxxxxxxxxxx.ap-northeast-1.es.amazonaws.com/test2/_mapping/sensor' -d @mapping.json |
すると・・・
|
1 |
{"acknowledged":true} |
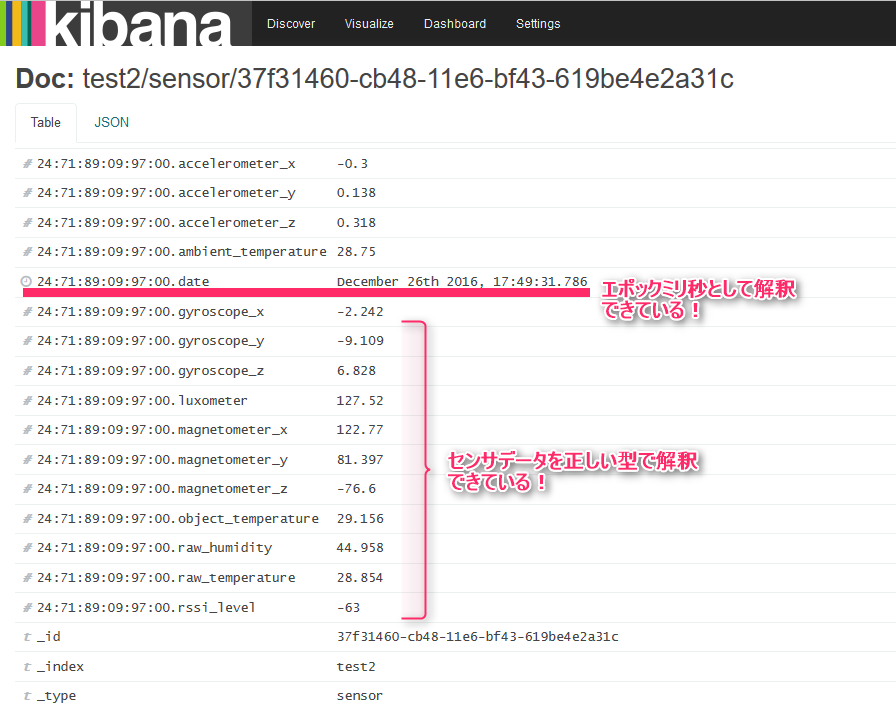
と返ってきて無事設定できました!
ただし、この方法は日付からインデックスを自動生成する設定にしている場合、一日おきにインデックスパターンを作らなければならず、実運用には向かないので注意が必要です。
再挑戦
上手くいくでしょうか・・・?

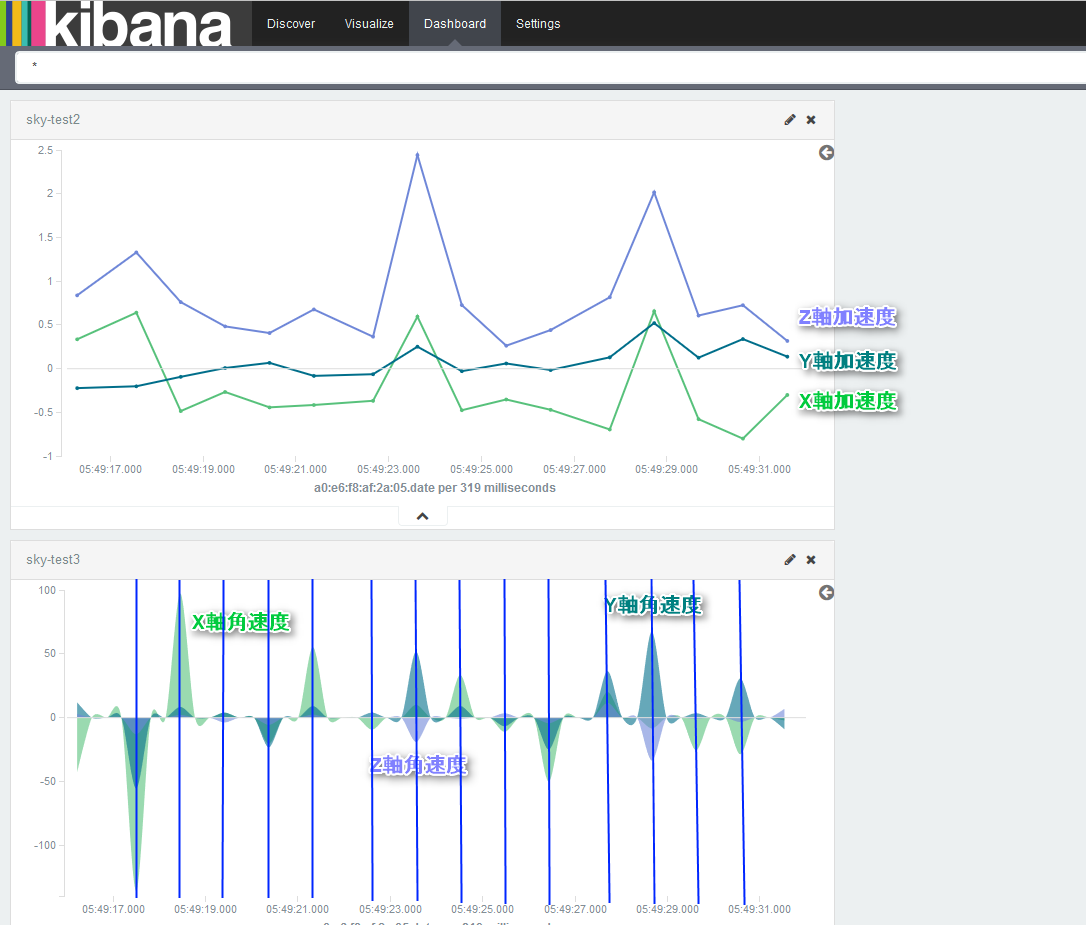
大成功です!
番外編
それでは、社内でも貧乏ゆすりが酷いことで有名なエンジニアの膝にセンサを設置、貧乏ゆすりのBPMを計ります。

今日も今日とてこのエンジニアは319[ミリ秒/回]=3.135[回/秒]=188[BPM]で貧乏ゆすりをしていることがわかりました!
記事は以上になります。
このたびはご覧戴き、ありがとうございました。
投稿者プロフィール
最新の投稿
 AWS2021年12月2日AWS Graviton3 プロセッサを搭載した EC2 C7g インスタンスが発表されました。
 セキュリティ2021年7月14日ゼロデイ攻撃とは
 セキュリティ2021年7月14日マルウェアとは
 WAF2021年7月13日クロスサイトスクリプティングとは?


