はじめに
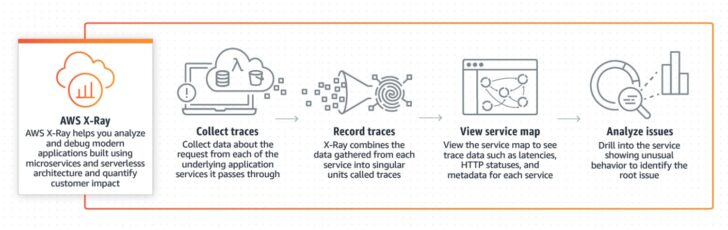
今回は X-Ray SDK for Python の使い方と、実際にAWS上で設定してどのようなデータが取得できるのかについて深掘りします。
今回利用する環境
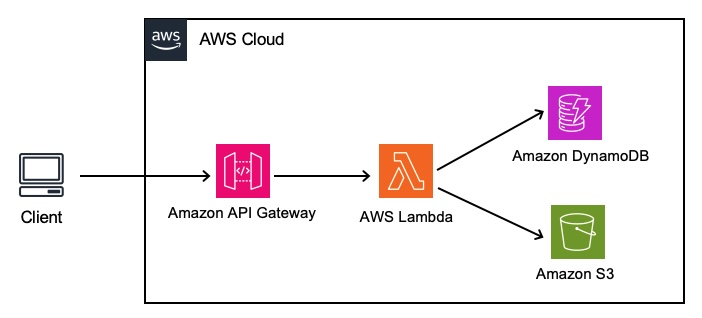
API GatewayにAPIリクエストをすると、LambdaがDynamoDBとS3に書き込みを行う構成を作成しました。
また、CloudShellからCloudFormation(SAM)を実行し環境デプロイを行います。
- AWS構成: API Gateway + Lambda + DyanmoDB / S3
- SAM CLI: 1.131.0
- Python: 3.9
- aws-xray-sdk: 2.14.0
目次
AWS X-Ray SDK for Python 設定方法
まずはじめに、AWS X-Ray SDK for Python の使い方を確認します。
参照: aws-xray-sdk - Basic Usage
https://docs.aws.amazon.com/xray-sdk-for-python/latest/reference/basic.html#manually-create-segment-subsegment
X-Ray SDK for Python のドキュメントに記載の通りですが、下記の設定を行うことで各箇所の計測が可能となります。
設定方法は3つあるので、それぞれの設定についてみてみます。
その1: 手動で開始位置と終了位置を指定する
特定の箇所のトレースを取得したい場合やフレームワーク・ライブラリがサポートされていない場合に利用できます。
segments / subsegments をスクリプトの任意の箇所に設定することでbegin~endまでの計測が可能となります。
|
1 2 3 4 5 6 7 8 9 10 |
from aws_xray_sdk.core import xray_recorder xray_recorder.begin_segment('name') # your code here xray_recorder.begin_subsegment('name') # some code block you want to record xray_recorder.end_subsegment() xray_recorder.end_segment() |
その2: 関数にデコレータを設定する
プログラムの各所に開始と終了のコードを埋め込んでいくのは非常に手間です。関数にデコレータを付与することで関数をサブセグメントとし計測することが可能です。特定の関数にかかる時間を計測したいときはこちらの capture を使用します。
|
1 2 3 |
@xray_recorder.capture('name') def my_func(): #do something |
その3: SDKでサポートされたサードパーティライブラリを使用する
サポートされているライブラリを使用している場合、patch_all() でリクエスト~レスポンスの計測が可能となります。
サービス・システムが分割管理されているマイクロサービスアーキテクチャの場合、DB接続やHTTPリクエストなど外部へのリクエストが頻繁に発生しますが、その処理を自動で計測してくれるのは非常に便利です。
|
1 2 3 |
from aws_xray_sdk.core import patch_all patch_all() |
下記の通り、必要なライブラリのみを指定することも可能です。
|
1 2 3 4 |
from aws_xray_sdk.core import patch i_want_to_patch = ('botocore') #a tuple that contains the libs you want to patch patch(i_want_to_patch) |
サポートされているライブラリは下記の通りで、AWSサービスやデータベース、HTTPリクエストなどコンポーネント接続は一通り利用可能となります。
参照:Third Party Library Support
https://docs.aws.amazon.com/xray-sdk-for-python/latest/reference/thirdparty.html--
SUPPORTED_MODULES = (
'aioboto3',
'aiobotocore',
'boto3',
'botocore',
'pynamodb',
'requests',
'sqlite3',
'mysql',
'httplib',
'pymongo',
'pymysql',
'psycopg2',
'pg8000',
'sqlalchemy_core',
'httpx',
)
また、今回は詳細までは触れませんが、
X-Ray SDK for Python では下記ミドルウェアがサポートされています。
- Django
- Flask
- Aiohttp
その他の設定
他にも、アノテーション・メタデータといった情報をトレースに追加することもできます。
例えば、セッションに含まれるユーザーIDやセッションIDなどの情報を追加することで、特定のユーザーのリクエストパターンや問題発生時の状況を分析が可能となります。
|
1 2 3 4 5 6 7 8 |
from aws_xray_sdk.core import xray_recorder segment = xray_recorder.current_segment() # value can be string, number or bool segment.put_annotation('key', value) # namespace and key must be string and value is an object # that can be serialized to json segment.put_metadata('key', json, 'namespace') |
たとえば、下記のような設定をすると subsegment_1 にアノテーション・メタデータ情報を追加することができます。
|
1 2 3 4 5 6 7 8 9 |
xray_recorder.begin_subsegment('subsegment_1') segment = xray_recorder.current_subsegment() # value can be string, number or bool segment.put_annotation('annotation1', "annotation test") # namespace and key must be string and value is an object # that can be serialized to json segment.put_metadata('data', {"key1": "value1"}, 'subsegment_1_metadata') xray_recorder.end_subsegment() |
実際のX-Rayでの表示は下記のようになります。

実際に確認してみる
API Gateway のX-Rayトレースを有効にしつつ、LambdaでX-Rayを有効にしたものとしていないものでコンソールを見比べてみます。
アプリケーションとしては、APIにリクエストするとユーザー情報をDynamoDBに保存し、関連ファイルをS3に保存するという簡単なものを用意しました。
アプリケーションの構成:
- API Gateway: RESTful APIのエンドポイント
- Lambda: ユーザー情報の処理
- DynamoDB: ユーザー情報の保存
- S3: ユーザー関連ファイルの保存
CloudFormationで作成したので下記の通りデプロイしてください。
デプロイ手順
CloudFormation実行に必要なファイルの作成
CloudShellから下記の通り実行して環境デプロイを実施します。
下記構成となるようにファイルを作成します。
|
1 2 3 4 5 |
project/ ├── template.yaml └── src/ ├── app.py └── requirements.txt |
- template.yaml
|
1 2 3 4 5 6 7 8 9 10 11 12 13 14 15 16 17 18 19 20 21 22 23 24 25 26 27 28 29 30 31 32 33 34 35 36 37 38 39 40 41 42 43 44 45 46 47 48 49 50 51 52 53 54 55 56 57 58 59 60 61 62 63 64 65 66 67 68 |
AWSTemplateFormatVersion: '2010-09-09' Transform: AWS::Serverless-2016-10-31 Parameters: EnvironmentName: Type: String Default: xray-sample Description: Environment name Resources: # API Gateway ApiGateway: Type: AWS::Serverless::Api Properties: StageName: dev TracingEnabled: true # Lambda Function ProcessUserFunction: Type: AWS::Serverless::Function Properties: CodeUri: ./src/ Handler: app.lambda_handler Runtime: python3.9 Timeout: 15 Architectures: - x86_64 Tracing: Active Policies: - DynamoDBCrudPolicy: TableName: !Ref UserTable - S3CrudPolicy: BucketName: !Ref UserFilesBucket Environment: Variables: TABLE_NAME: !Ref UserTable BUCKET_NAME: !Ref UserFilesBucket Events: ApiEvent: Type: Api Properties: Path: /users Method: post RestApiId: !Ref ApiGateway # DynamoDB Table UserTable: Type: AWS::DynamoDB::Table Properties: TableName: !Sub ${EnvironmentName}-users-table AttributeDefinitions: - AttributeName: userId AttributeType: S KeySchema: - AttributeName: userId KeyType: HASH BillingMode: PAY_PER_REQUEST # S3 Bucket UserFilesBucket: Type: AWS::S3::Bucket Properties: BucketName: !Sub ${AWS::StackName}-user-files Outputs: ApiEndpoint: Description: API Gateway endpoint URL Value: !Sub https://${ApiGateway}.execute-api.${AWS::Region}.amazonaws.com/dev/users |
- src/app.py
|
1 2 3 4 5 6 7 8 9 10 11 12 13 14 15 16 17 18 19 20 21 22 23 24 25 26 27 28 29 30 31 32 33 34 35 36 37 38 39 40 41 42 43 44 45 46 47 48 49 50 51 52 53 54 55 56 57 58 59 60 61 62 63 64 65 66 67 68 69 70 71 72 73 74 75 76 77 78 79 80 81 82 83 84 85 86 87 88 89 90 91 92 93 94 95 96 97 98 99 100 101 102 103 104 105 106 |
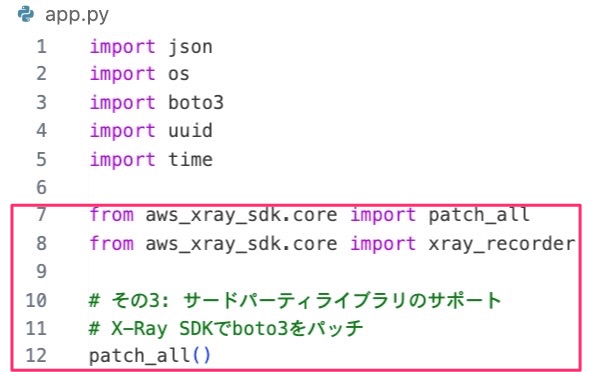
import json import os import boto3 import uuid import time from aws_xray_sdk.core import patch_all from aws_xray_sdk.core import xray_recorder # その3: サードパーティライブラリのサポート # X-Ray SDKでboto3をパッチ patch_all() ### その1: 手動でトレースの開始と終了を指定 def xray_function_sample1(): xray_recorder.begin_segment('segment_1') xray_recorder.begin_subsegment('subsegment_1') time.sleep(0.1) segment = xray_recorder.current_subsegment() # value can be string, number or bool segment.put_annotation('annotation1', "annotation test") # namespace and key must be string and value is an object # that can be serialized to json segment.put_metadata('data', {"key1": "value1"}, 'subsegment_1_metadata') xray_recorder.begin_subsegment('subsegment_2') time.sleep(0.1) xray_recorder.begin_subsegment('subsegment_3-1') time.sleep(0.1) xray_recorder.end_subsegment() xray_recorder.begin_subsegment('subsegment_3-2') time.sleep(0.1) xray_recorder.end_subsegment() xray_recorder.end_subsegment() xray_recorder.end_subsegment() xray_recorder.end_segment() # その2: 関数にデコレータを設定する @xray_recorder.capture('xray_function_sample2') def xray_function_sample2(): xray_recorder.begin_subsegment('subsegment_1') time.sleep(0.1) xray_recorder.end_subsegment() # その3: サードパーティライブラリのサポート def xray_function_sample3(body, user_id): try: xray_recorder.begin_subsegment('boto test') # AWS サービスのクライアント初期化 dynamodb = boto3.resource('dynamodb') s3 = boto3.client('s3') # DynamoDBにユーザー情報を保存 table = dynamodb.Table(os.environ['TABLE_NAME']) table.put_item( Item={ 'userId': user_id, 'name': body.get('name'), 'email': body.get('email') } ) # S3にダミーファイルを保存 bucket_name = os.environ['BUCKET_NAME'] file_content = f"User data for {user_id}" s3.put_object( Bucket=bucket_name, Key=f"users/{user_id}/info.txt", Body=file_content ) return { 'statusCode': 200, 'body': json.dumps({ 'userId': user_id, 'message': 'User created successfully' }) } xray_recorder.end_subsegment() except Exception as e: return { 'statusCode': 500, 'body': json.dumps({ 'error': str(e) }) } def lambda_handler(event, context): # リクエストボディの取得 body = json.loads(event['body']) # ユーザーIDの生成 user_id = str(uuid.uuid4()) # 1. segments/subsegmentsでトレースされるサンプル xray_function_sample1() # 2. 関数デコレータでトレースされるサンプル xray_function_sample2() # 3. 以下、botoはpatch_all()にてトレースされるサンプル res = xray_function_sample3(body, user_id) return res |
- src/requirements.txt
|
1 |
aws-xray-sdk |
2. 必要なモジュールのインストール
aws-xray-sdkは展開してLambdaへ一緒にアップロードする必要があるので下記コマンドを実行します。
|
1 |
pip install -r src/requirements.txt -t ./src |
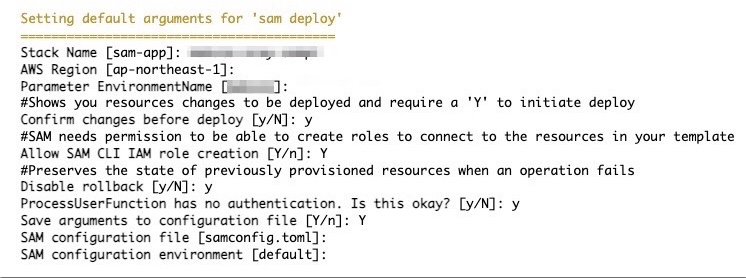
3. デプロイの実行
ファイルが準備できたらSAMデプロイを実行します。
※sam-cliがインストールされていない環境の場合はインストールしてから実行してください。
|
1 2 |
sam build sam deploy --guided |
参考までに下記の通り実行しました。
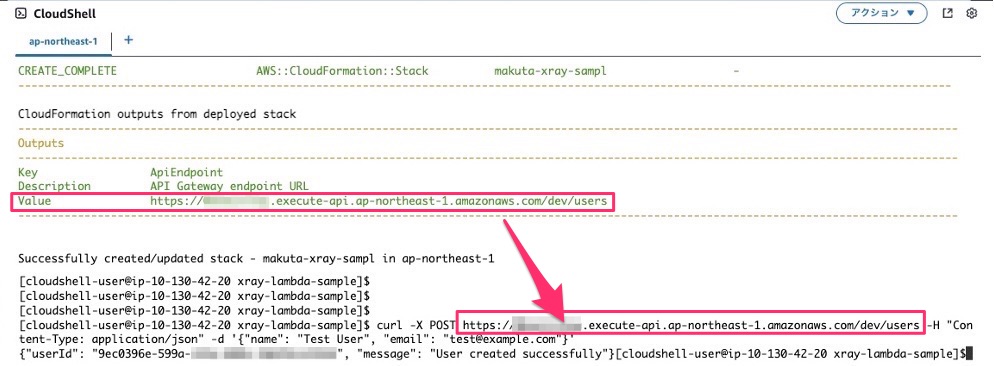
4. API実行
SAMの実行結果にある、ApiEndpoint の値からAPI Gateway のリクエストURLを確認し、下記の通りリクエストを実施します。
|
1 2 3 |
curl -X POST https://{ApiEndpoint}/dev/users \ -H "Content-Type: application/json" \ -d '{"name": "Test User", "email": "test@example.com"}' |
APIリクエストする際のURLについては、sam deployのOutPutsにURLが出力されるのでそちらを利用してください。
5. 動作確認
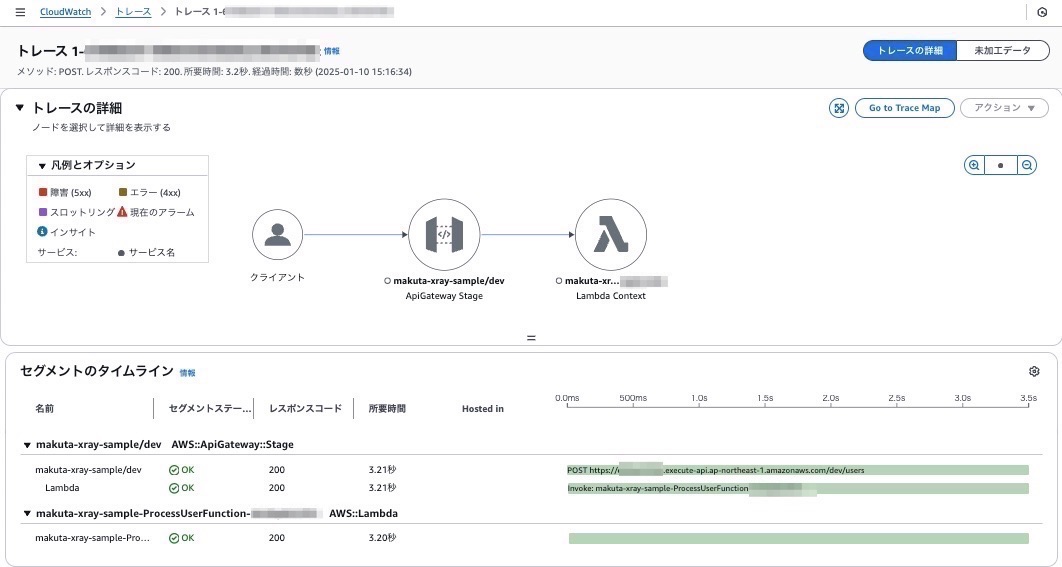
AWSコンソールから「CloudWatch - X-Rayトレース - トレース」を確認します。
最新のトレースに先ほどのリクエストがあると思うのでそちらを押下してトレースされた情報を確認します。
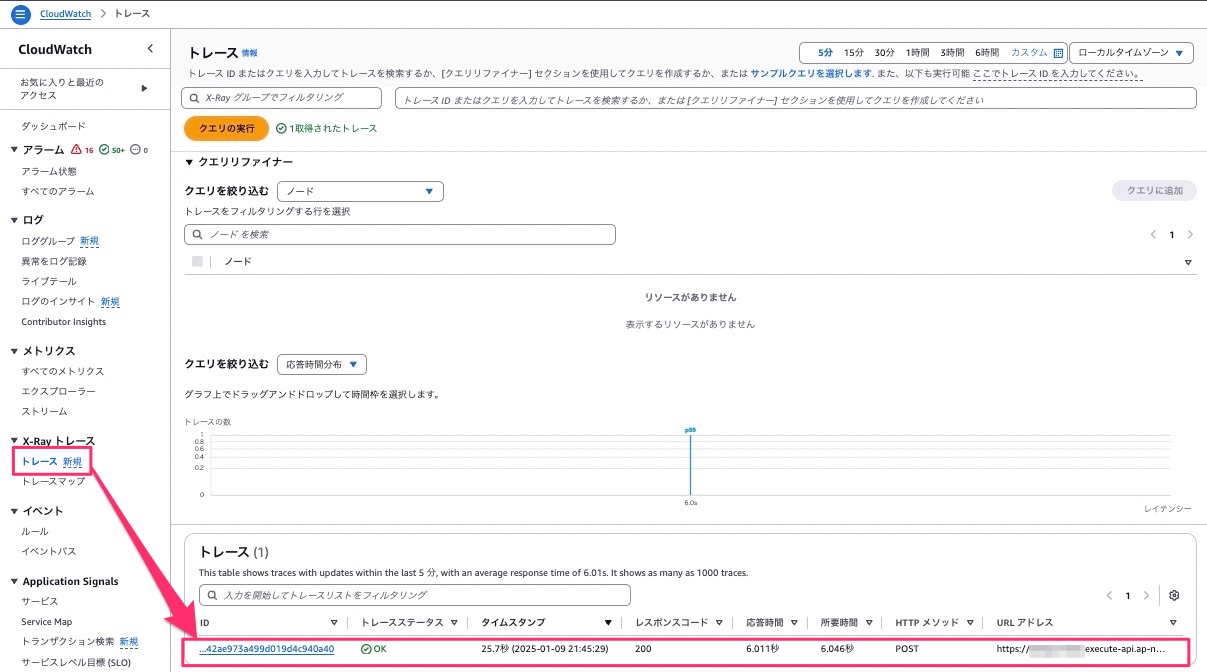
このようにトレースが確認できれば成功です。
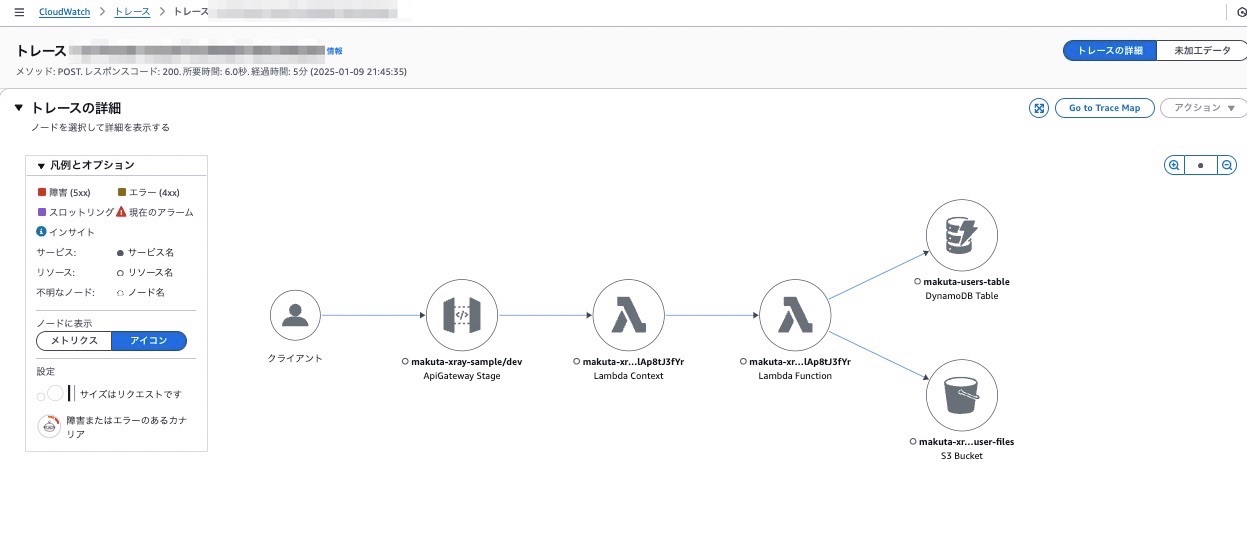
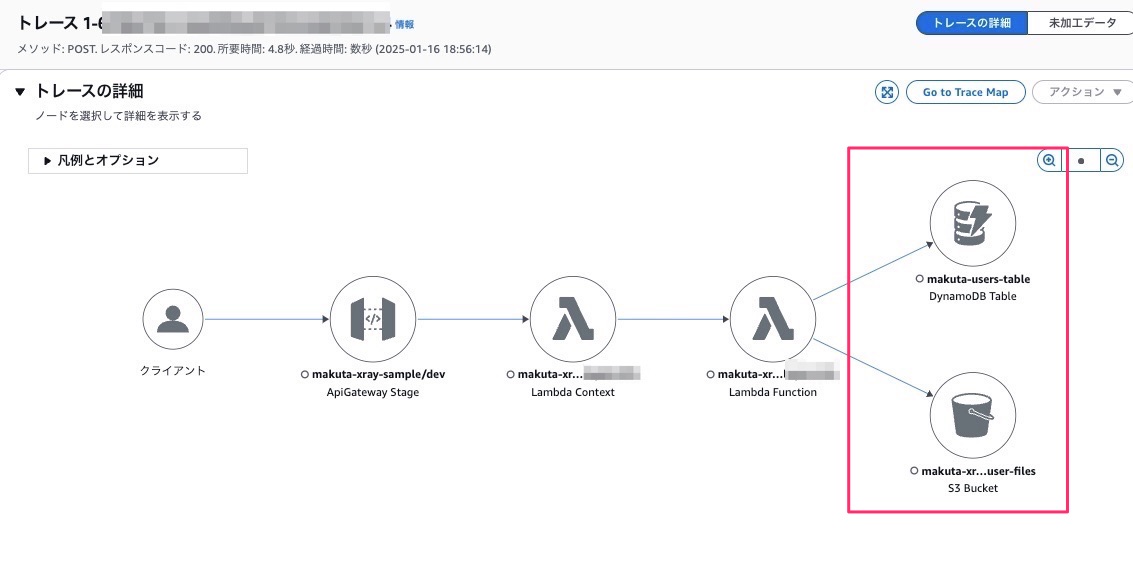
「トレースの詳細」を見ると、
API GatewayからLambdaが呼び出され、それぞれDynamoDBとS3へ接続していることがわかります。
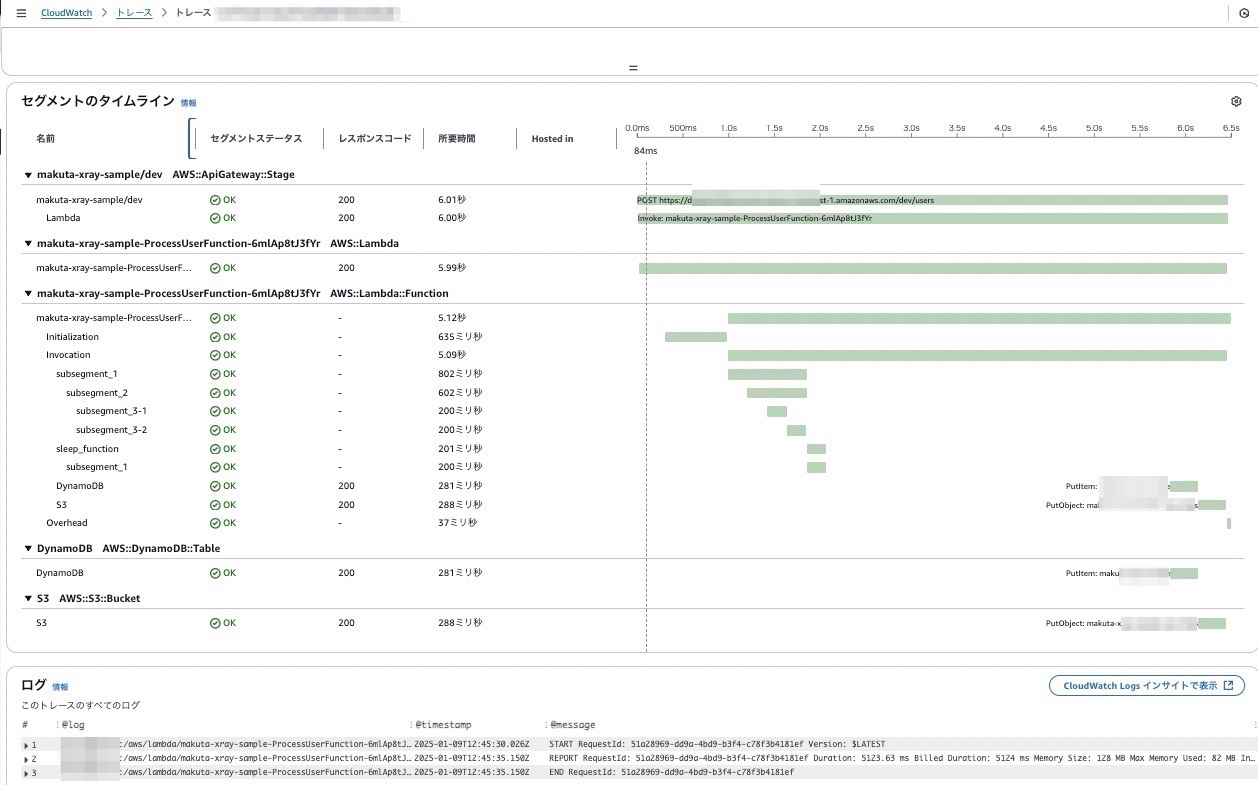
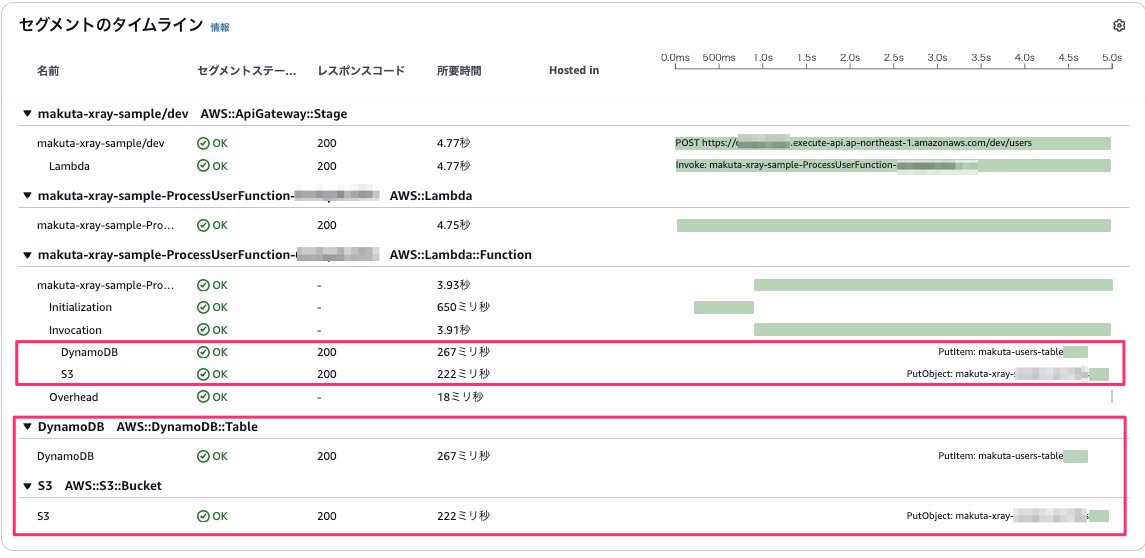
続いて、「セグメントのタイムライン」を見てみます。
それぞれ セグメント(処理)にかかった時間 と 処理が成功・失敗 したかが下記の通りわかります。
API Gatewayがリクエストを受信してからレスポンスを返すまでの時間と、バックエンドのLambdaがそれぞれの処理にかかった時間を簡単に把握することが可能になっています。
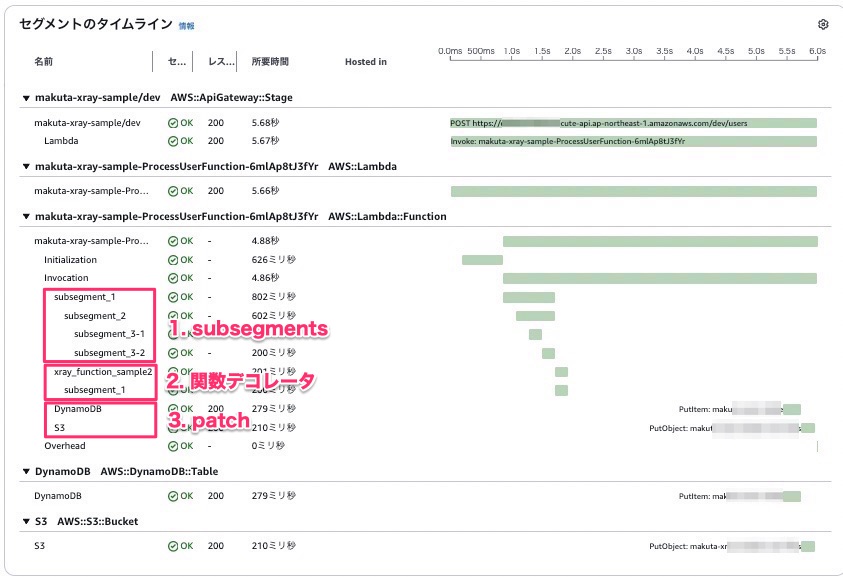
また、SDKの計測方法それぞれ3種類については下記のように取得されます。
subsegmentsの入れ子構造や、関数デコレータ内のsubsegementsなど、意図通り計測がされていました。
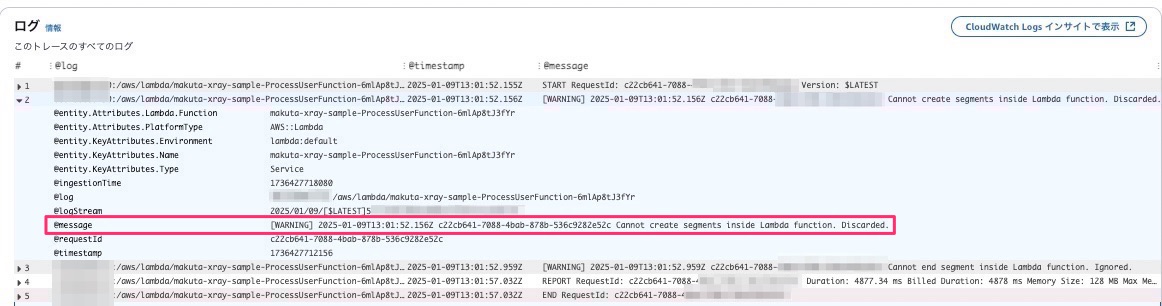
LambdaでSDKを使用する際の注意点
実行時のLogsにも出力されていましたが、Lambdaでは segments は利用できず、subsegments を設定する必要があるので注意です。
参考までに、下記ログが出力されていました。
[WARNING] Cannot create segments inside Lambda function. Discarded.
AWSサービスでのトレース有効化とSDKの違いを確認する
今回、APIGateway/Lambdaのトレースを有効にし、SDKにて内部のトレース情報を取得しました。
それぞれの設定でどこまで取得できるのかも確認したのでまとめておきます。
- 1: API Gatewayのトレースを有効 /Lambdaトレースを無効 / SDKを無効
- 2: API Gatewayのトレースを有効 / Lambdaトレースを有効 / SDKを無効
- 3: API Gatewayのトレースを有効 / Lambdaトレースを有効 / SDKを有効
先ほどのアプリケーションを利用して、設定とソースコードをAWSコンソール上から修正して利用します。※無効化する方法は今回省略します。
1: API Gatewayのトレースを有効 /Lambdaトレースを無効 / SDKを無効
API Gateway のステージ設定で、「X-Rayトレース」を有効化します。
Lambdaトレースは無効化にしている状態です。
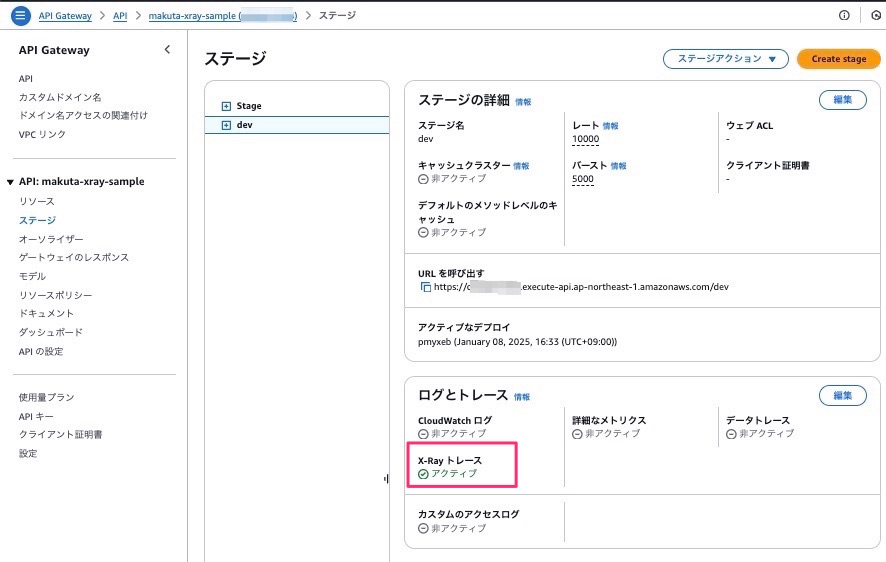
この状態でAPIリクエストを実行すると、
API GatewayとLambdaが表示されました。S3/DynamoDBは表示されず、SDKも設定していないのでLambda内のトレースも表示されない状態です。
2: API Gatewayのトレースを有効 / Lambdaトレースを有効 / SDKを無効
続いて、Lambdaのサービストレースを有効化します。
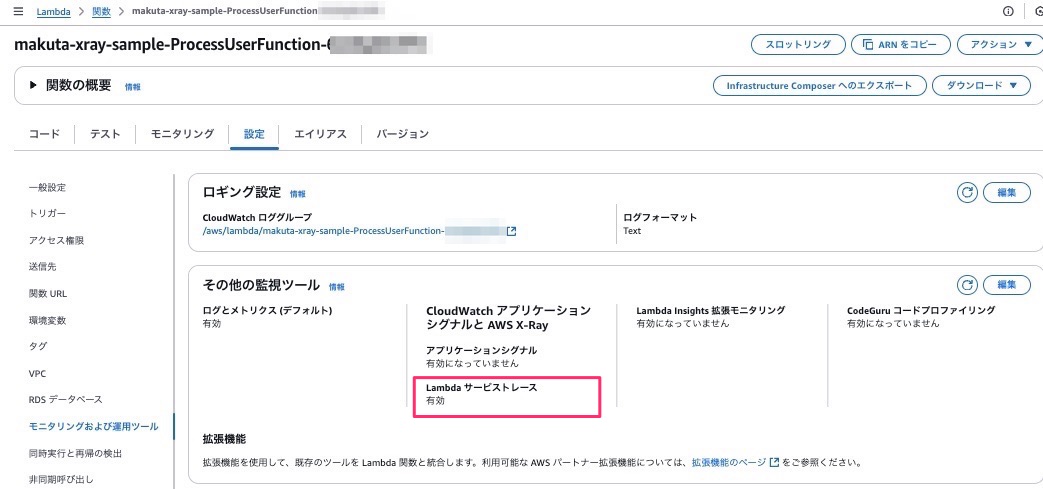
APIリクエストを実行すると、
今回もAPI GatewayとLambdaが表示されました。S3/DynamoDBは表示されず、SDKも設定していないのでLambda内のトレースも表示されない状態です。
違いといえば一点、Lambda Functionの情報が追加されています。
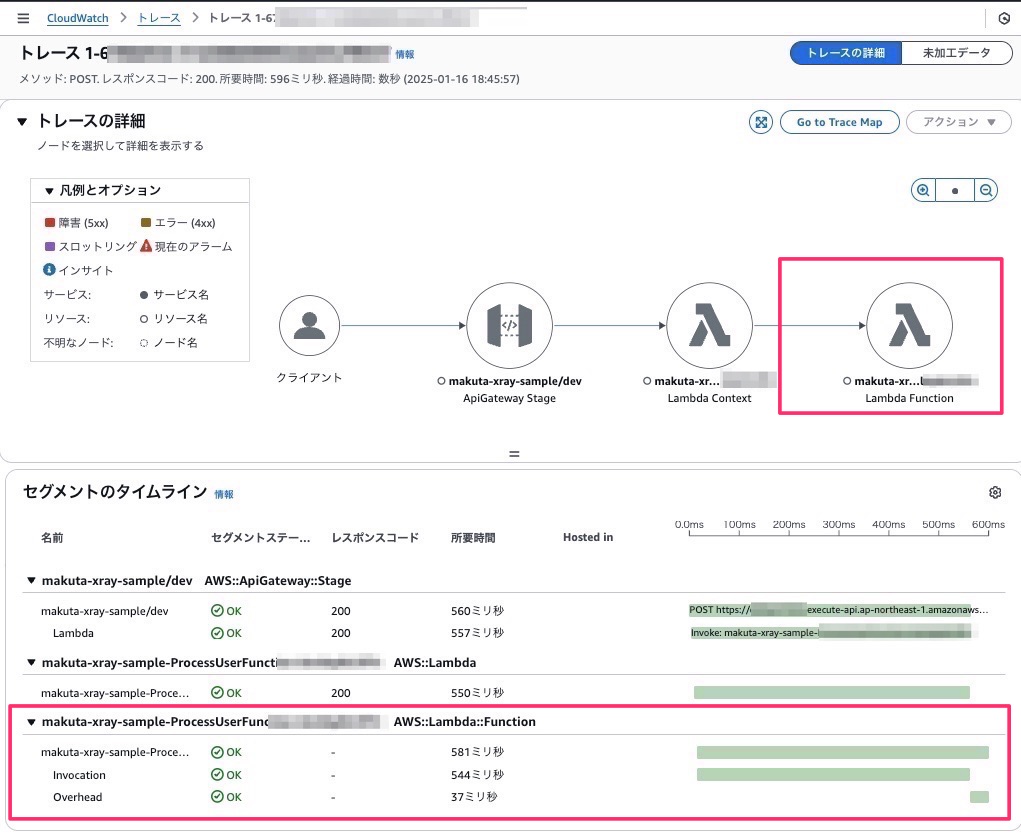
3: API Gatewayのトレースを有効 / Lambdaトレースを有効 / SDKを有効
最後にLambdaのスクリプトでX-Ray SDKを有効にします。
LambdaをデプロイしてAPIを実行します。
すると、Lambdaがboto3で接続しているDynamoDB・S3が追加されています。
タイムラインにもDynamoDB/S3が追加され、各処理のタイミングや処理にかかった時間などを確認することができます。
まとめ
実際にX-Rayを使ってみたことで実装方法や表示内容など理解することができました。
X-Rayを活用することで、マイクロサービスアーキテクチャにおけるパフォーマンス分析や問題解決が効率的に行えるので是非お試しください。
参考
- https://d1.awsstatic.com/webinars/jp/pdf/services/20200526_BlackBelt_X-Ray.pdf
今回でてきた用語やX-Rayの概念などの詳細に解説されています。
投稿者プロフィール
-
2024 Japan AWS Top Engineers
2025 AWS Community Builders
AWSを使ったサーバレスアーキテクチャ・コンテナサービスの設計・構築を担当。
最新の投稿
 AWS2025年3月31日Aurora Provisioned vs Serverless v2:最適な選択と移行ガイド
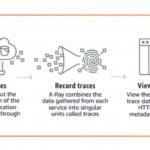 AWS2025年1月17日AWS X-Ray SDK for Python 実践ガイド:トレース設定から可視化まで深堀りしてみた
 NewRelic2024年12月25日【New Relic】アプリ初心者でも大丈夫!インフラエンジニアがはじめるAPM/Browser超入門 〜1時間で始める可視化への第一歩〜
 AWS re:Invent 20242024年12月22日Amazon ECSのAmazon CloudWatch Container Insightsでオブザーバビリティ強化されたので、AWS X-Rayとともに検証してみた