PDFmake is a fully declarative and has a powerful layout engine for print pdf in Client/service side of your application.
It is also Open Source and has very active contributors.
For more information visit: PDFmake
We are also using the ipam.ttf for Japanese font support.
by downloading it in this URL: ipa.ttf
Installation Instructions:
Install npm and Node modules by running the script.
- For RPM-based distributions:
1
sudoyuminstallnodejs npm --enablerepo=epel - For Debian based distributions:
1
sudoapt-getinstallnodejs nodejs-legacy npm
In your package.json file add the following line:
1 | 'pdfmake-browserified': '^0.1.4' |
or execute this:
1 | npm install pdfmake-browserified |
Let's use browserified version because during production builds, when including this module, you want to exclude this module from minification/uglification/compression, as it is already minified.
Meaning, the necessary files are already included in the app. and i'ts already a minified javascript version.
Note: Make sure you installed browserify-rails in your application.
By using this link: browserify-rails
Execute install script.
1 | sudo npm i |
Import the library into your application (For example).
1 2 3 | var createPdf = require('pdfmake-browserified');var dd = { content: 'This is a sample PDF printed with pdfMake' };createPdf(dd).open(); |
Japanese Characters support
Now, We are going to add the necessary dependencies for Supporting Japanese Characters.
Let's use a font builder from .ttf file into a portable .js file in pdfmake-fonts-google by cloning it outside your project:
1 | git clone https://github.com/xErik/pdfmake-fonts-google.git |
Once you have cloned the repository, we need to extract the ipam.tff that was downloaded into the fonts directory:
1 | pdfmake-fonts-google/lib/ufl |
Then we need to install node dependencies first before running the build the font script.
1 | npm install |
Then run the the build script using grunt which we declared in the lib/* folder.
1 | grunt |
Once the script is done, We are now going to use the built file by copying the .js and .map.js file located in:
1 | pdfmake-fonts-google/build/browserified/ufl |
Add the two files to your rails javascript assets.
Then include them to your create pdf parameters by referring to this example code.
1 2 3 4 5 6 7 8 9 10 11 12 13 | var createPdf = require('pdfmake-browserified'); var map = require('path_to_your_file/browserified/ofl/ipam.map.js'); // font style mapping var data = require('path_to_your_file/browserified/ofl/ipam.js'); // font datavar defaultFont = Object.keys(map)[0];vardocDefinition = {content: ['This is a sample PDF printed with pdfMake', 'これはpdfMakeで印刷サンプルPDFです',],defaultStyle: { font: defaultFont }};createPdf(docDefinition, map, data).open(); |
Output:
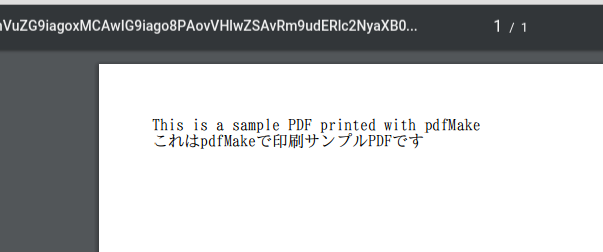
Thats it! Your good to go. For more details about how to use pdfmake please refer to this site and documentation, The site has also a playground for you to check out how it works.
Pdfmake Site
PDFmake Documentation
PDFmake Playground
投稿者プロフィール
最新の投稿
 AWS2021年12月2日AWS Graviton3 プロセッサを搭載した EC2 C7g インスタンスが発表されました。
 セキュリティ2021年7月14日ゼロデイ攻撃とは
 セキュリティ2021年7月14日マルウェアとは
 WAF2021年7月13日クロスサイトスクリプティングとは?

